


Challah is a type of yeasted bread popular in Jewish cuisine. It is similar to a brioche but with no dairy. Challah usually contains eggs; however, like my other challah recipes, this one is vegan—light, fluffy, dairy-free, and egg-free. Before baking, I brush the dough with oat milk and top it with sesame seeds.


These rolls might seem like a lot of work because they are small and braided, but they are easy to make. The shaping isn’t tricky; if anything, they are a lot of fun. They are even a great project to do with young children! I have linked below to see how the braiding is done or go to @goodnessis Instagram stories.

challah rolls
preparation 2½ – 3 hours
baking time 25 minutes
makes 8 small challah rolls
The recipe uses a mixer with a dough hook, but you can easily use your hands.
dough ingredients
2 Tbsp/20g flaxseed
1 cup + 2 Tbsp (246g) oat or nut milk
6 Tbsp/60g olive oil
1 heaped tsp active dry yeast
1¼ cups/150g whole spelt flour
2¼ cups/350g white spelt flour
¼ cup/40g light brown sugar
1 tsp fine rock salt
toppings
oat milk for brushing
sesame and poppy seeds
preparation
- In the bowl of a stand mixer fitted with the dough hook attachment, whisk together the flaxseeds, warm oat milk, oil, and yeast. Leave it to sit for 10 minutes, undisturbed, until the mixture foams, about 5 – 6 minutes.
- Add the flour, sugar, and salt to the yeast and milk mixture, turn the machine onto the lowest setting, and knead on medium speed for about 5 – 10 minutes. The dough should be elastic and smooth. If it seems too sticky, add more flour, a tablespoon at a time, or if it is too dry, add more liquid, a teaspoon at a time. The dough should feel tacky but shouldn’t stick to your hands.
- Cover with a damp tea towel and allow the dough to sit in a warm place for 1 – 1½ hours until well risen and doubled in size.
plaiting the dough
- Take out the dough and divide it into eight equal pieces, approximately 110g each. Using your palms, starting from the centre and working outward, elongate 1 piece by rolling it gently against the work surface with even pressure until you have formed a rope approximately 40 cm long.
For easy braiding instructions, refer to this video – jump to 1:02 mins.
- Place the strand onto the work surface, bring the end piece around, and pinch it into the middle of the strand to look like a number 6. Then, take the long strand and bring it over the top and through the loop; allow it to hang while you gently pull and twist the loop into a figure 8. Bring the strand from underneath and over the right side so that it tucks down into the bottom of figure eight. Gently pinch it underneath.
- Place on a baking tray and repeat with the remaining seven pieces. Brush with oat milk and sprinkle with poppy and sesame seeds.
- Cover loosely with an oiled plastic wrap or a damp tea towel and set aside in a warm place to rise for 1 – 1½ hours.
- About 15 minutes before the dough has finished rising, preheat an oven to 180C/350F. Remove the plastic wrap or towel and bake for 25 minutes or until golden brown. Rotate the tray halfway through. Allow to cool down before cutting into them fully.
variations
- 6 rolls – divide into 6 pieces, approx. 145g each – roll to 45 cm
- 10 rolls – divide into 10 pieces, approx. 90g each – roll to 35 cm
- 12 rolls – divide into 12 pieces, approx 80g each – roll to 30 cm
- You can leave the dough rising overnight. After the first rise, when the dough has doubled, store it in the fridge covered with plastic wrap. The following day, leave room temperature for an hour and resume braiding.
- You can make them pull-apart rolls by placing the shaped rolls into a lined baking dish close together so they touch after the second rise/baking.
tip
Make sure to divide the dough into evenly sized portions for even baking.


The cold crept in on Friday—
our heating silenced,
the hot water still.
We wrapped ourselves in coats and blankets,
layers upon layers,
three pairs of socks,
gathered like pilgrims around the fire’s glow.
Outside, the sun rose clear and kind,
and we followed it
to our favourite lookout—
a quiet walk above the world,
crisp air in our lungs,
the hush of winter all around.
We filled two IKEA bags with pinecones,
tokens of the forest’s quiet offering.
We made it home before the curfew bell,
just as the hands struck one.
Pinecones fed the flames,
the oven hummed low and warm,
and I baked—
muffins,
golden and simple,
the scent of comfort
rising like prayer.


I love
the grittiness of cornmeal
and the soft, sweet dates.
Slather them in butter,
add a spoonful of strawberry jam—
as you would a scone—
and watch the warmth melt through.
The jam’s sweetness
a gentle harmony.
Each bite,
a small, golden joy
on a winter’s day.
recommended variation
Finish with a generous drizzle of tahini caramel (see recipe below).

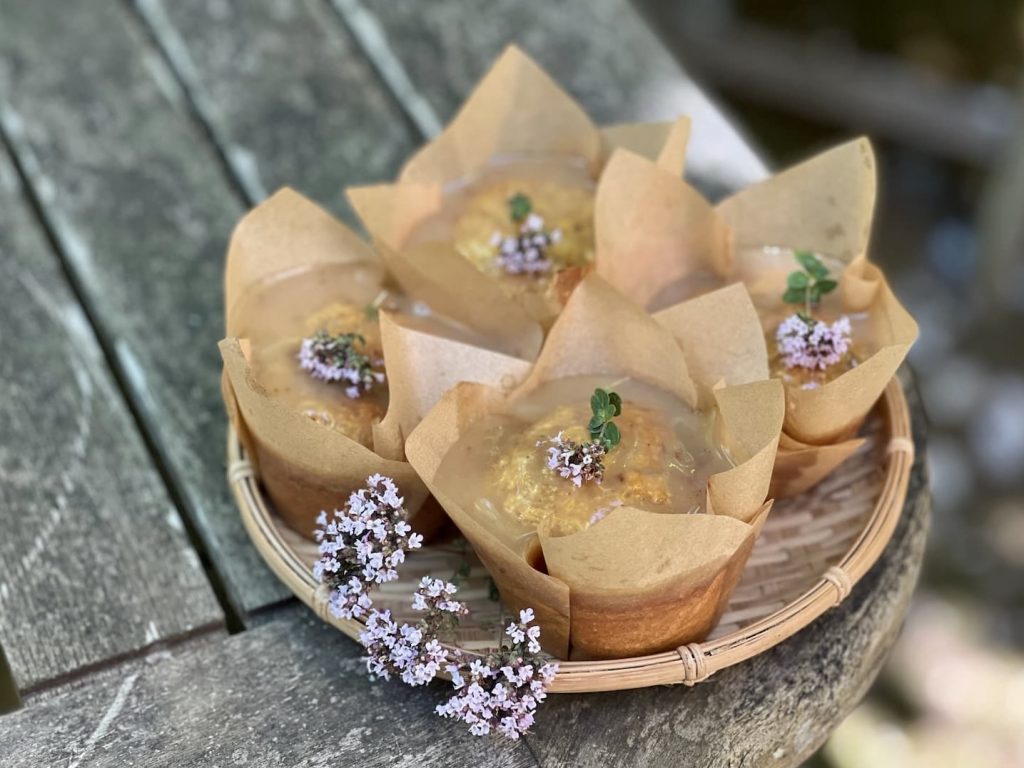
cornbread date muffins
preparation 45 minutes
serves 8 muffins (I use these sized baking cups)
recipe from here.
ingredients
6 pitted Medjool dates (120g)
½ cup/100g boiling water
2 heaped Tbsp/18g ground flaxseed
3 Tbsp/30g melted coconut oil
1 cup/225g unsweetened warmed oat/rice milk
¾ cup/120g medium-ground yellow cornmeal (can use polenta)
¾ cup/90g white spelt flour
2 tbsp/15g coconut sugar/brown sugar
1 Tbsp baking powder
¼ tsp fine rock salt
preparation
- Preheat the oven to 180C/350F. Place seven baking cups in your muffin tray and set aside.
- Put the dates and ground flaxseed in a medium bowl and pour in the boiling water. Allow to soak for 10 minutes.
- Then add the melted coconut oil and mash the dates with a fork until they are mostly creamy, but with a few chunks remaining—this can also be done in a food processor. Gradually add the warmed oat milk and whisk until well combined.
- Add cornmeal, flour, sugar, baking powder, and salt. Mix with a fork until the wet and dry ingredients are well combined.
- Spoon the batter into the prepared muffin cups, distributing it evenly among them (they should be full).
- Bake for 25 – 30 minutes or until the muffins are golden. Let cool in the tin for about 10 minutes, then transfer to a wire rack to cool.
Serve them with butter and honey-tahini whipped cream (recipe below) or almond butter and homemade jam.


These cookies are soft and chewy on the inside and crispy around the edges. This is achieved in the baking by keeping the cookie dough round rather than pressing it flat. The taller you make the dough, the chewier the centre. The bottom of the cookie dough bakes first, spreads out, and the top remains thick and chewy in the middle. I added finely chopped crystallized ginger for added texture and zing. To make the cookies less sweet, skip rolling in sugar. However, the cracking effect on the cookies will not be achieved. This happens when the cookies are rolled in granulated sugar (I use a combination of granulated blond and brown sugar).


tips
- Avoid using blackstrap molasses in baking. It is solid and bitter and will impart an unfavourable taste. Use light-tasting molasses, and if not available, combine dark molasses and date syrup (silan), which will soften the flavour, making it perfect for baking.
- The cookies will bake up flat if your coconut oil is too liquid. Place the measured amount in the freezer until it is solid—you want it to be solid but slightly soft enough for cutting.

double ginger molasses cookies
preparation 20 minutes
makes 14 cookies
recipe adapted from here.
ingredients
1 cup/120g white spelt flour
½ tsp baking soda
½ tsp baking powder
1 tsp ginger powder
½ tsp cinnamon powder
¼ tsp ground nutmeg
2 Tbsp/20g finely chopped crystallized ginger
⅓ cup/70g soft coconut oil (not melted) or vegan butter
¼ cup/35g brown sugar or coconut sugar
¼ cup/80g light-coloured molasses (if using dark molasses, use only 30g and add 50g date syrup)
1 Tbsp water
granulated brown sugar for rolling
preparation
- Preheat oven to 180C/350F. Line a baking sheet with parchment paper and set aside.
- In a medium bowl, whisk together the flour, baking soda, baking powder, ginger, cinnamon, nutmeg and crystallized ginger. Set aside.
- With a hand beater or whisk, beat the oil, sugar, molasses and water until creamy. Fold in the flour mixture until combined. It will seem dry initially; keep mixing until all the flour is incorporated. (If your cookie dough is too wet, the coconut oil is not solid enough. Cover and place in the freezer for 10 minutes to fix this.)
- Scoop a spoon of dough (approx. 20g) and roll into a ball, then into the sugar; place on the prepared baking sheet and bake for 12 – 15 minutes until golden. Rotate the tray halfway through cooking. Allow to cool on the baking sheet.
Happy Holidays and Happy Baking!


I make this dressing often. It is fresh, light, and cleansing. My favourite way of using it is poured over a vibrant beetroot and carrot salad (see below), a simplified version of this salad. It has become a ‘goodness is’ signature dish when served alongside coriander leaf vanghi bath, vegetable bath, or this whole moong dal. The combinations and flavours complement each other.


I am always up early to enjoy the house’s quiet and the garden’s stillness.
Each morning, the mist materializes, holding us in until midday; it clears and reappears at the end of the day, then repeats itself the next day- shifting our perception from one moment to the next.

an exceptional-zingy-ginger-sweet-lemon dressing
ingredients
2 Tbsp/20g grated ginger
2 Tbsp/10g grated turmeric
3 Tbsp/30g olive oil
3 Tbsp/50g agave or honey
¼ cup/52g lemon juice
¼ tsp fine rock salt
preparation
- Whisk the dressing ingredients in a small jug with a fork. Allow to sit for 10 minutes for the flavours to develop.
My favourite way of serving
Peel equal amounts of beetroot and carrots (depending on the number of people), then use a mandoline to grate the beetroot and carrots into a salad bowl. Do not mix just yet. Sprinkle over a generous amount of toasted sesame seeds. When ready to serve, pour the desired dressing over the salad, gently lift to mix the colours, and distribute the dressing.
The key to the success of this salad is the right size shavings. Don’t be tempted to use a hand grater; it will produce a sloppier mix that loses appeal. Use a mandolin if you have one; alternatively, you can use the largest grate in the food processor or a knife and cut very thin matchstick gratings.


Round challahs are traditionally baked for the Jewish New Year, Rosh Hashana, to symbolize the continuity of life. On Rosh Hashana, we dip challah and apples in honey to symbolize our hopes for a sweet New Year. For this reason, Rosh Hashana challahs are often sweeter than those served the rest of the year. Some add more sugar than usual to the dough, while others add raisins or sprinkle cinnamon and sugar.


May this upcoming year be filled with sweet blessings and lead you closer to your inner happiness.

round challah for Rosh Hashana
If you want to make this a traditional three-braided challah, click here for instructions on how to braid it.
preparation – 2½ hours
baking time -35 minutes
makes 1 large round challah
The recipe uses a mixer with a dough hook, but you can easily use your hands.
ingredients
2 Tbsp/20g flaxseed
1 cup + 2 Tbsp/246g warm milk or almond milk
6 Tbsp/60g olive oil
1 tsp active dry yeast
1¼ cups/150g whole spelt flour
2¼ cups/350g white spelt flour
¼ cup/40g light brown sugar
1 tsp fine rock salt
toppings
oat milk for brushing
black and white sesame seeds
preparation
- In the bowl of a stand mixer fitted with the dough hook attachment, whisk together the flaxseeds, warm almond milk, oil, and yeast. Leave it to sit for 10 minutes, undisturbed, until the mixture foams, about 5 – 6 minutes.
- Measure the flour, sugar, and salt, whisk together, and add to the yeast and milk mixture. Turn the machine to the lowest setting and knead at medium speed for 5 – 10 minutes. The dough should be elastic and smooth. If it seems too sticky, add more flour, a tablespoon at a time, or if it is too dry, add more liquid, a tablespoon at a time.
- Cover with a damp tea towel and allow the dough to sit in a warm place for 1 – 1½ hours until well-risen and doubled in size. The longer it sits, the better the bread.
- Take out the dough, knead a little with the heel of your hands and work it into a ball.
plaiting the dough
- Divide the dough into four equal pieces, approximately 214g each. Using your palms, starting from the center and working outward, elongate one piece by rolling it gently against the work surface with even pressure until you have formed a rope approximately 23 inches or 60 cm long. Repeat with the remaining three pieces.
- Place two strands parallel to one another vertically. Weave one strand horizontally through the two vertical strands, placing it on the left-hand strand and underneath the right-hand strand. Do the same with the remaining strand, but weave it underneath the left-hand strand and on top of the right-hand strand. The strands should sit snug to each other, with no space in between, looking like a large plus sign. (Refer to the photos below and watch this video; it is more difficult to explain than it is to do.)


- Starting from the bottom of your plus sign, take the left-hand strand and cross it over the right one. Moving counter-clockwise, do the same for the remaining strands.
- Now, switch directions. Look at the first strand you crossed at the bottom of your loaf (it should now be horizontal instead of vertical). Take what is now that strand’s right-hand neighbour and cross it over, going clockwise. Do that with the remaining strands.
- Keep switching directions until you have run out of dough to plait. You may have to stretch it a little to weave it all together.


- Pinch the remaining dough together and tuck it under the loaf so it looks neat. Transfer the braided loaf to the baking tray, brush it with oat milk, and sprinkle it with black and white sesame seeds.


- Cover loosely with an oiled plastic wrap or a damp tea towel and set aside in a warm place to rise for 1½ hours.
- About 15 minutes before the dough has finished rising, preheat an oven to 180C/350F. Remove the plastic wrap or towel and bake for 35 minutes or until golden brown. Allow the challah to fully cool down before cutting into it.

Shana Tova!
round seeded challah
Here’s another way to make a round challah. Watch this video for very easy instructions. Divide the dough into three pieces, roll each strand into 65cm long, and proceed to plait.


note to self
- 6 rolls – divide into 6 pieces, approx. 145g each – roll to 45 cm
- 10 rolls – divide into 10 pieces, approx. 90g each – roll to 35 cm
- 12 rolls – divide into 12 pieces, approx 80g each – roll to 30 cm

We first made this dish with Ganapathi Aarya in the Jivana Yoga Programme; after that, I made it once or twice, and then it got tucked away and forgotten. Only when Lior made it one Wednesday after practice did I remember how delicious it was. Now, it is a dish I make every week. I cook the dal and rice separately to keep them fluffy and whole. This means you are using three pans for cooking: one for the rice, one for the dal, and one for the vegetables. If wanting to keep it simple, soak the whole moong dal overnight and cook it with the rice the following day, as in the original recipe.
to serve
grated beetroot and carrot salad with ginger-lemon-sweet dressing, raita with dill, and a finely sliced cucumber. Use a mandoline to grate the carrot and beetroot and slice the cucumber finely.
A mandoline is a helpful kitchen tool, especially for putting together a quick salad, so much so that my son has asked to take one back to university!
Vegetable Bath is suitable for all constitutions – simple, nourishing and balancing.


Niyamas
“One of the niyamas is santoṣa – “contentment”. Many people are confused when trying to differentiate between contentment and happiness. Contentment is a feeling of satisfaction or completeness. Contentment arises from inside of us. It tends to have a lasting or enduring quality. Happiness is a feeling of pleasure or lightness that tends to be a result of some external reason and is usually fleeting.”
The Sacred Tradition of Yoga by Dr. Shankaranarayana Jois

vegetable bath
preparation 45 minutes
serves 3
All the spice measurements are heaped unless otherwise stated.
ingredients
¼ cup/50g whole moong dāl + 2 cups water
¾ cup/150g white basmati rice + 1¾ cups water
½ cup/40g dried shredded coconut
1½ – 2 heaped tsp sambar powder (moderately spiced)
1¼ flat tsp fine rock salt
1 tsp ghee
¼ cup coriander leaves, chopped
voggarane
⅓ cup/80ml peanut or coconut oil
½ heaped tsp black mustard seeds
⅛ heaped tsp asafoetida powder
⅛ heaped tsp turmeric powder
20 fresh curry leaves
3 cups/350g beans, carrot, capsicum
¾ cup water
½ flat tsp fine rock salt
preparation
- In a small saucepan, rinse the dāl, add 2 cups of water and simmer for 20 – 25 minutes; set aside.
- Wash and drain the rice in a medium pan. Add 1¾ cups water and bring to a boil, then reduce heat to maintain a rapid simmer. Simmer, uncovered, for 8 – 10 minutes or until the water evaporates and the rice is cooked; turn off the heat, cover, and set aside for 10 minutes. Add the cooked dāl.
- Cut vegetables into small uniform pieces and measure the remaining ingredients.
voggarane
- In a skillet, over medium heat, add the oil and mustard seeds; when the seeds turn grey and pop, add asafoetida, turmeric powder, and curry leaves. Fry for a few seconds, then add the vegetables—mix well.
- Add water and ½ tsp salt, and simmer uncovered until vegetables soften—8 minutes, stirring once or twice.
- Add rice and dal, coconut, sambar powder, remaining salt, ghee and coriander to the vegetables. Combine well and serve.
serve
Twice a week, as a morning or midday meal, across all seasons.
variation
Using a pressure cooker, combine all ingredients, including the vegetables, alongside the separately fried voggarane with 2 cups water. Cook for three whistles – set aside until the pressure has subsided.


