


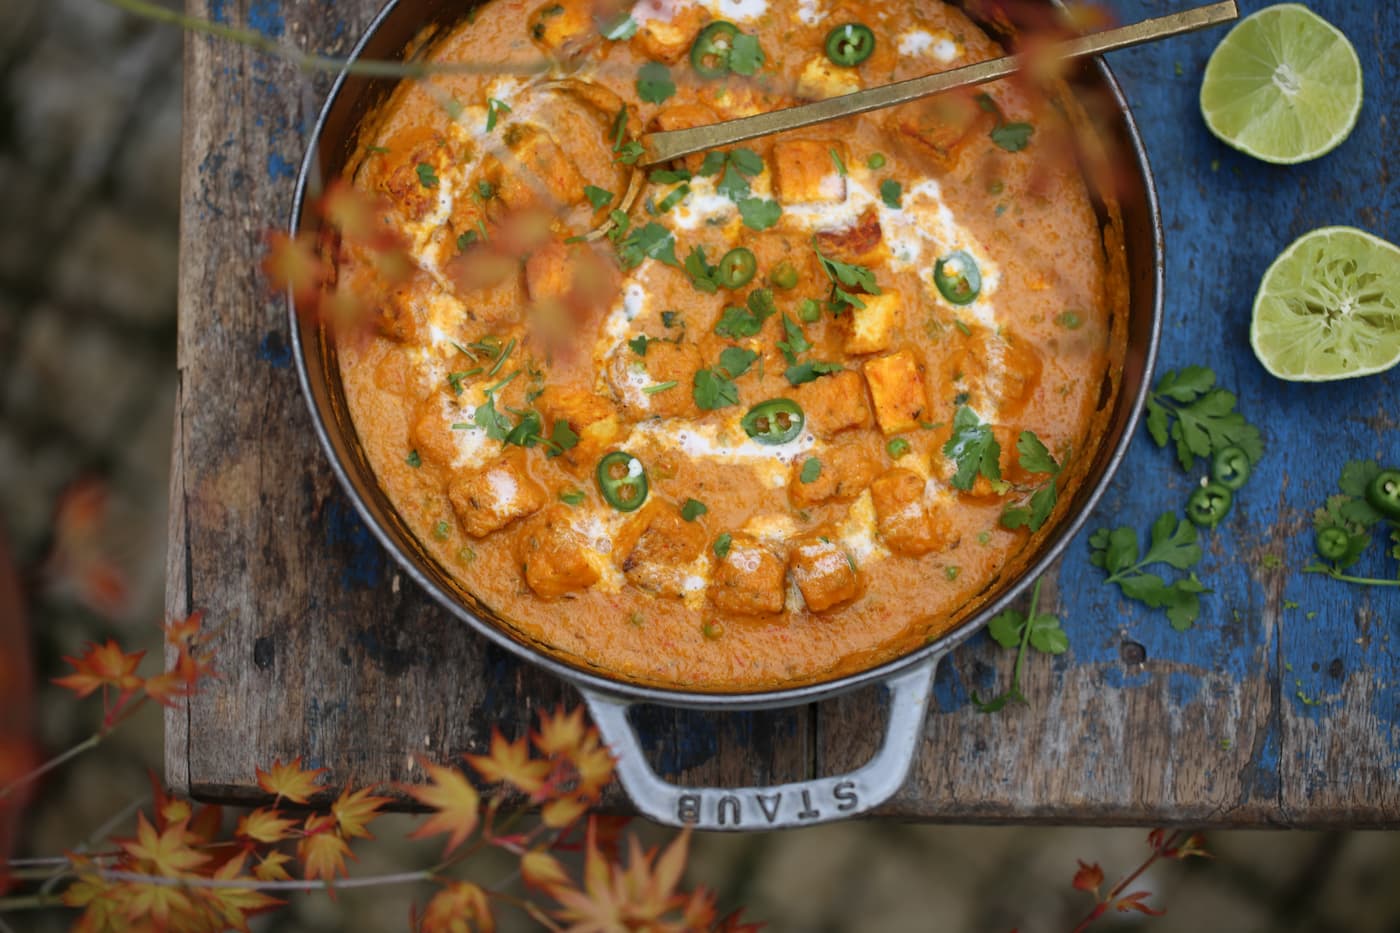
Inspired by our trips to India, this dish holds a special place in my heart. Without fail, on our last night before heading home, we would stop at a favourite restaurant and order this comforting classic — a ritual that became part of the journey itself.
When we returned home, Gillian generously shared her recipe with me. I made it again and again, gently adjusting the spices and balance until I found the version — the one that never fails. This recipe, adapted from Curating the Table, is the result.
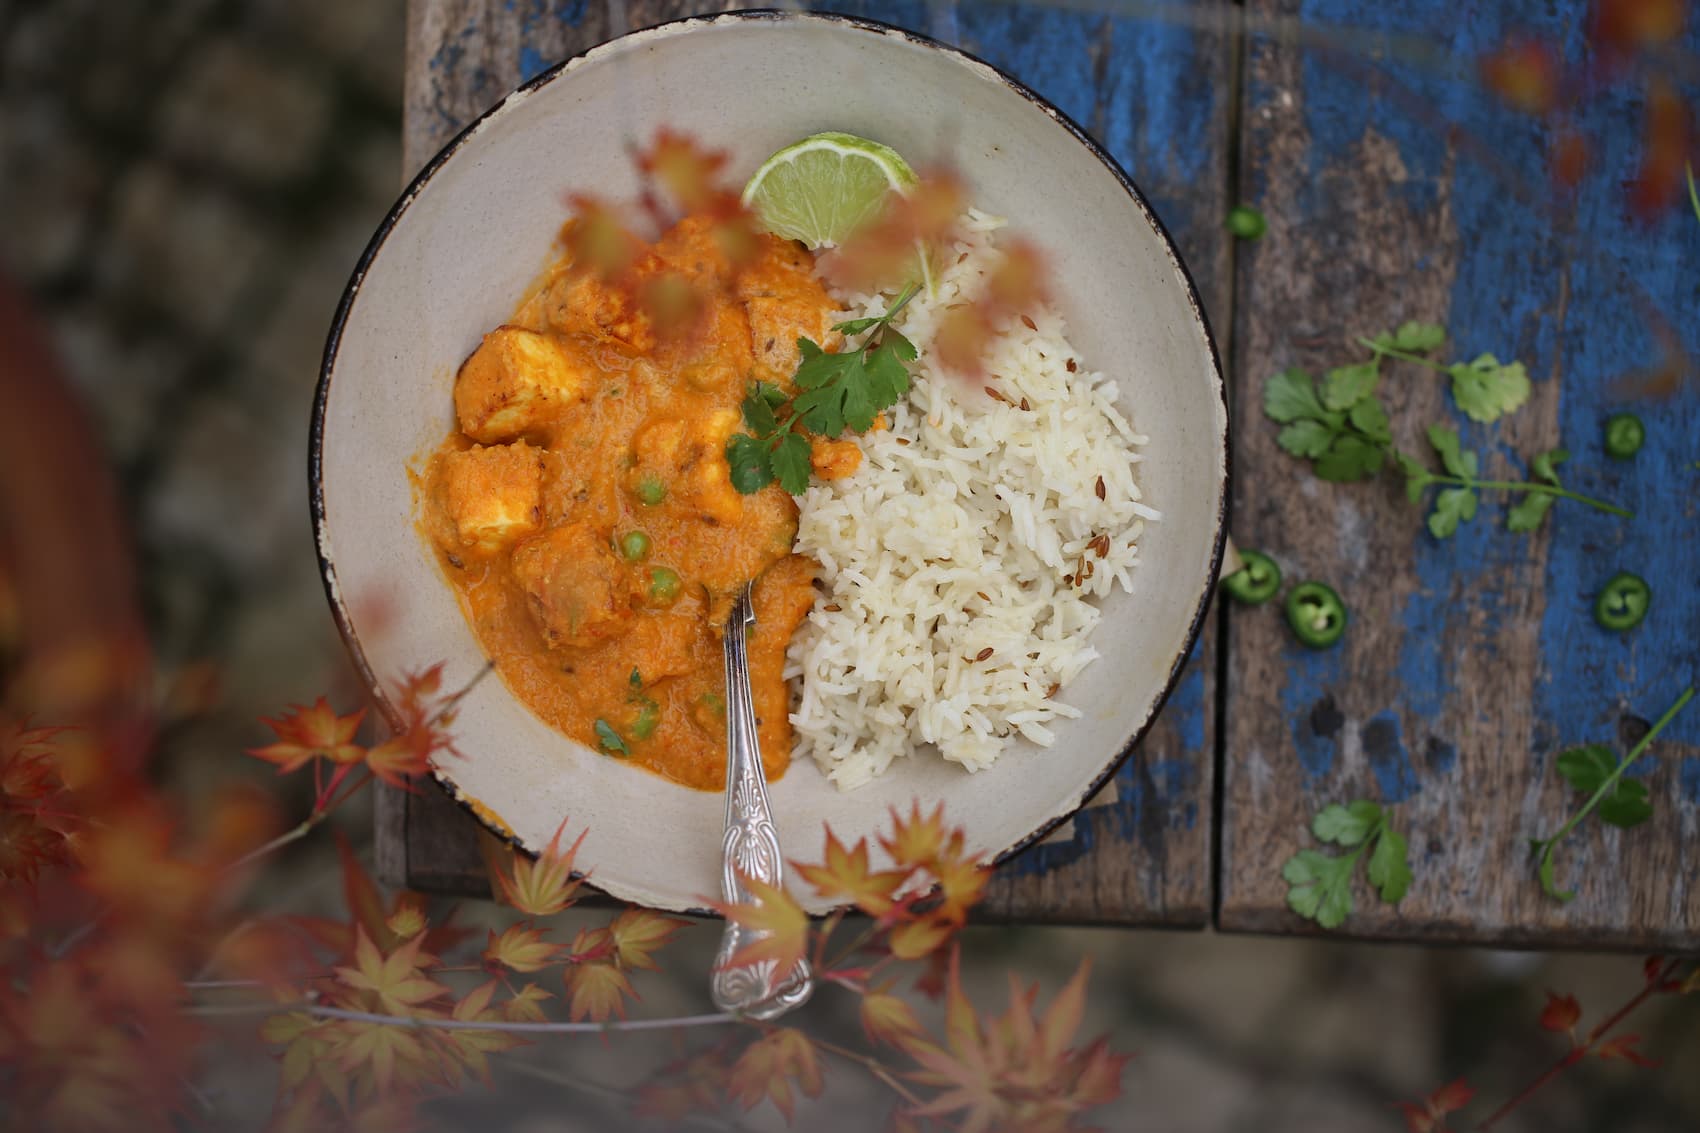
what makes this matar paneer so special
Soft, homemade paneer makes all the difference. I make my own so the cubes are extra tender and creamy, holding their shape while soaking up every bit of flavour. The paneer simmers gently in a warmly spiced tomato gravy, rich with aromatics and layered spices. Sweet green peas add little bursts of freshness, creating a beautiful balance between richness and brightness in every bite.
This version is simple, well-balanced, and deeply flavourful. A final squeeze of fresh lime lifts the entire dish, adding a subtle brightness that ties everything together beautifully.
how to serve it
Serve this matar paneer with:
Fluffy basmati rice or jeera rice (recipe coming soon)
Warm, pillowy naan
Or simple steamed greens
- In summer, a crunchy cucumber salad
It’s a deeply satisfying, complete meal — comforting, fragrant, and full of warmth.
Matar Paneer – A Comforting North Indian Classic
preparation 30 minutes
serves 2 generously (or 3 smaller portions)
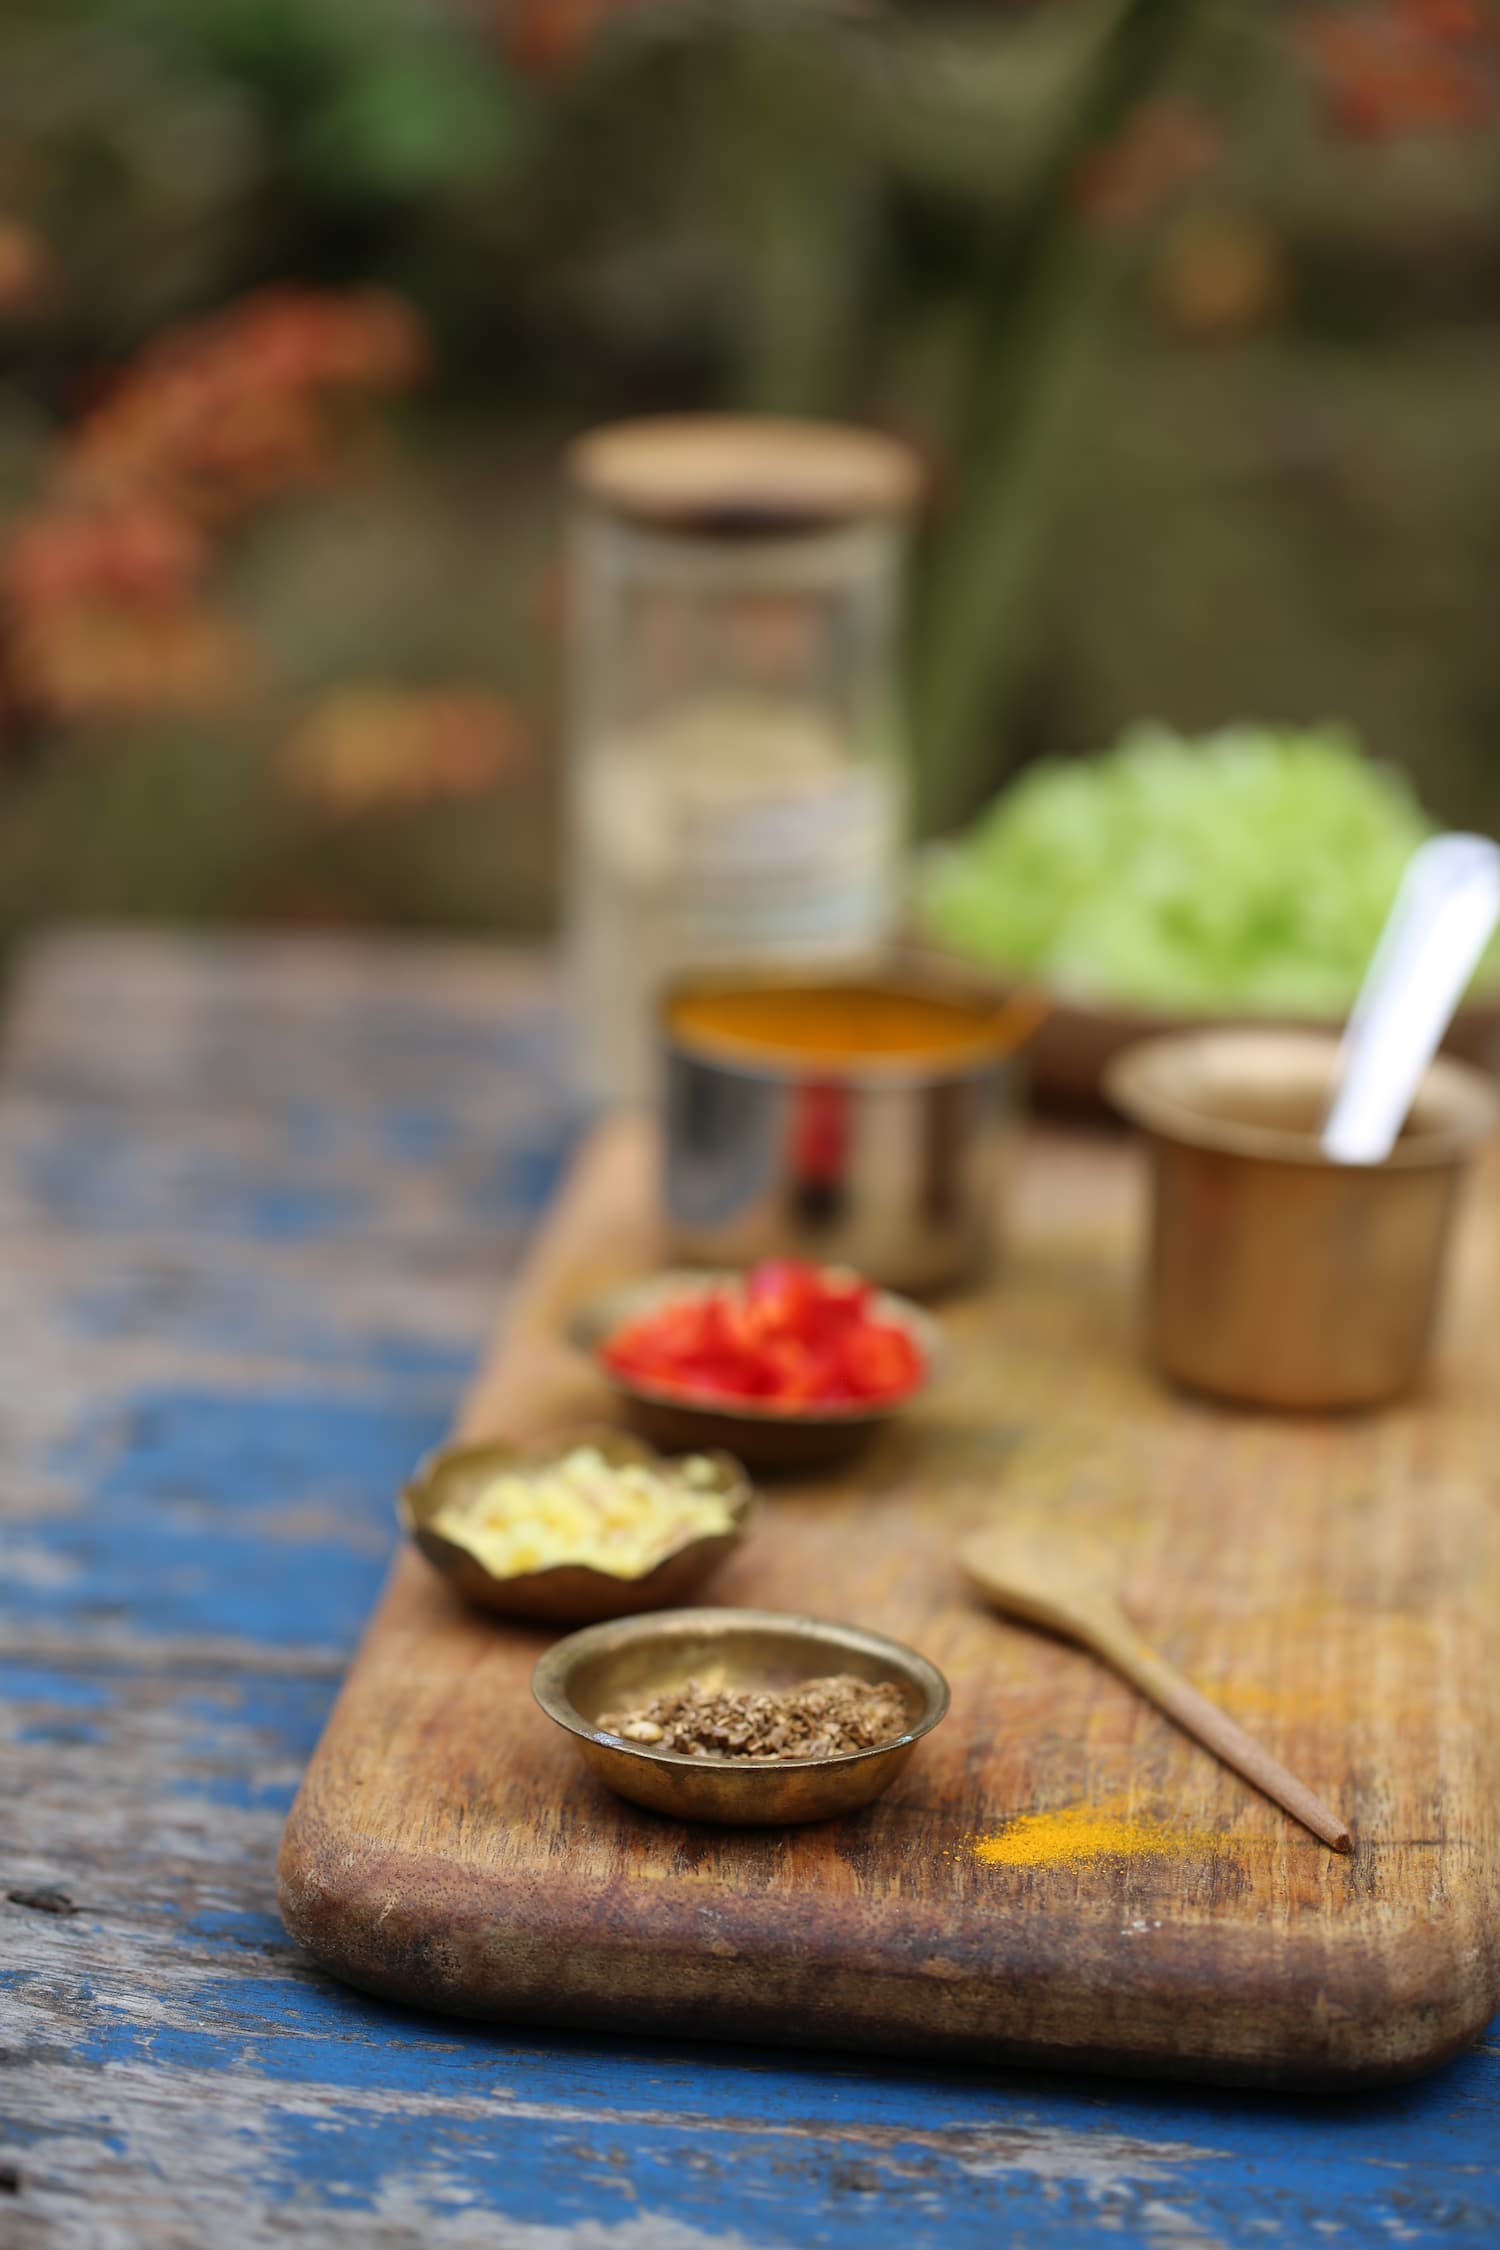
ingredients for masala base
3 Tbsp peanut oil
⅛ tsp asafoetida powder
1 red jalapeño, seeds removed and finely chopped (adjust to taste)
150g / 3 stalks celery, chopped
6g / 1 Tbsp ginger, grated or finely chopped
½ tsp turmeric powder
1 tsp freshly toasted ground coriander
250g / 4 plum ripe tomatoes, chopped
1 tsp fine rock salt, or to taste
1 tsp jaggery
½ cup/110g warm water (for blending)
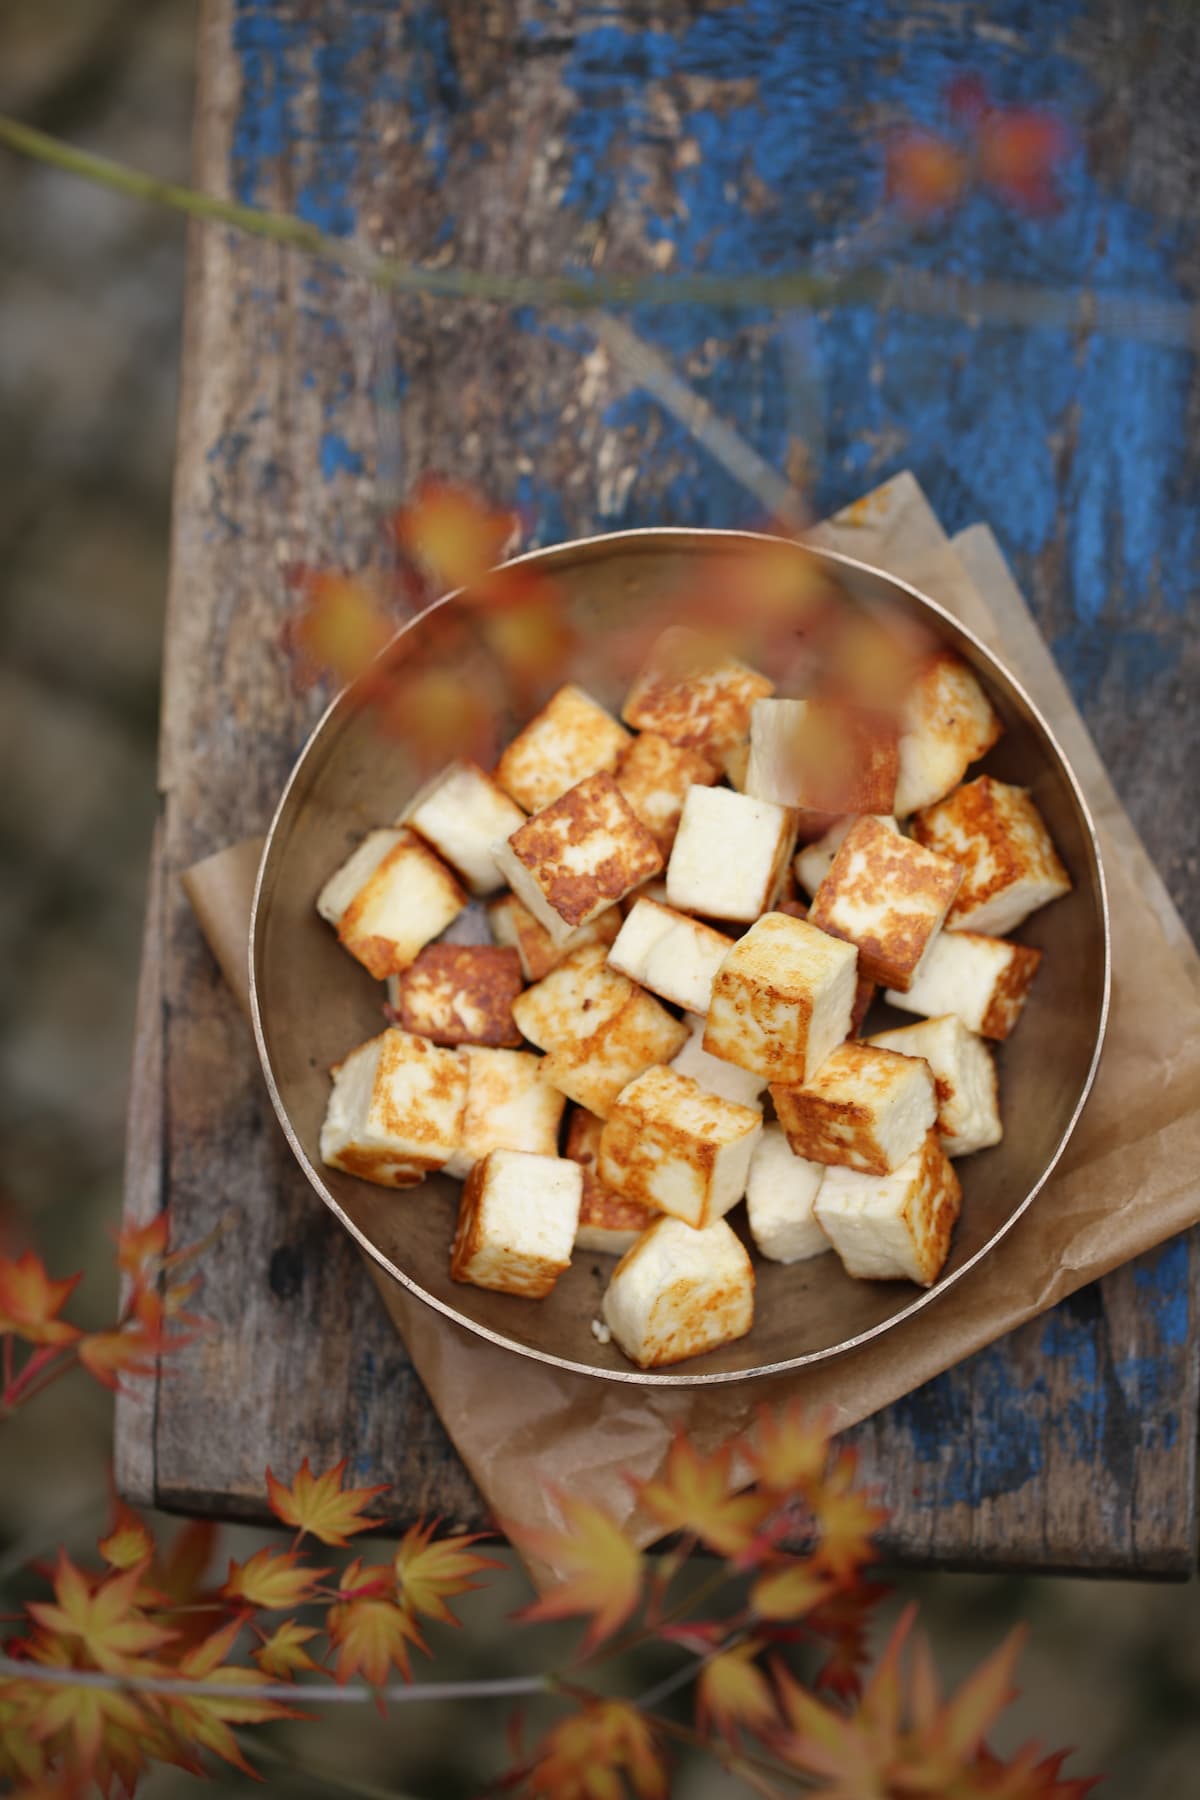
paneer
250g homemade paneer, cubed
1 Tbsp ghee (for frying)
for assembling
1 Tbsp ghee
1 tsp cumin seeds
¼ cup / 35g peas (fresh or frozen)
¼ – ½ cup warm water (as needed)
½ tsp garam masala
¼ cup chopped fresh coriander
2 Tbsp yogurt
squeeze fresh lime juice (optional)
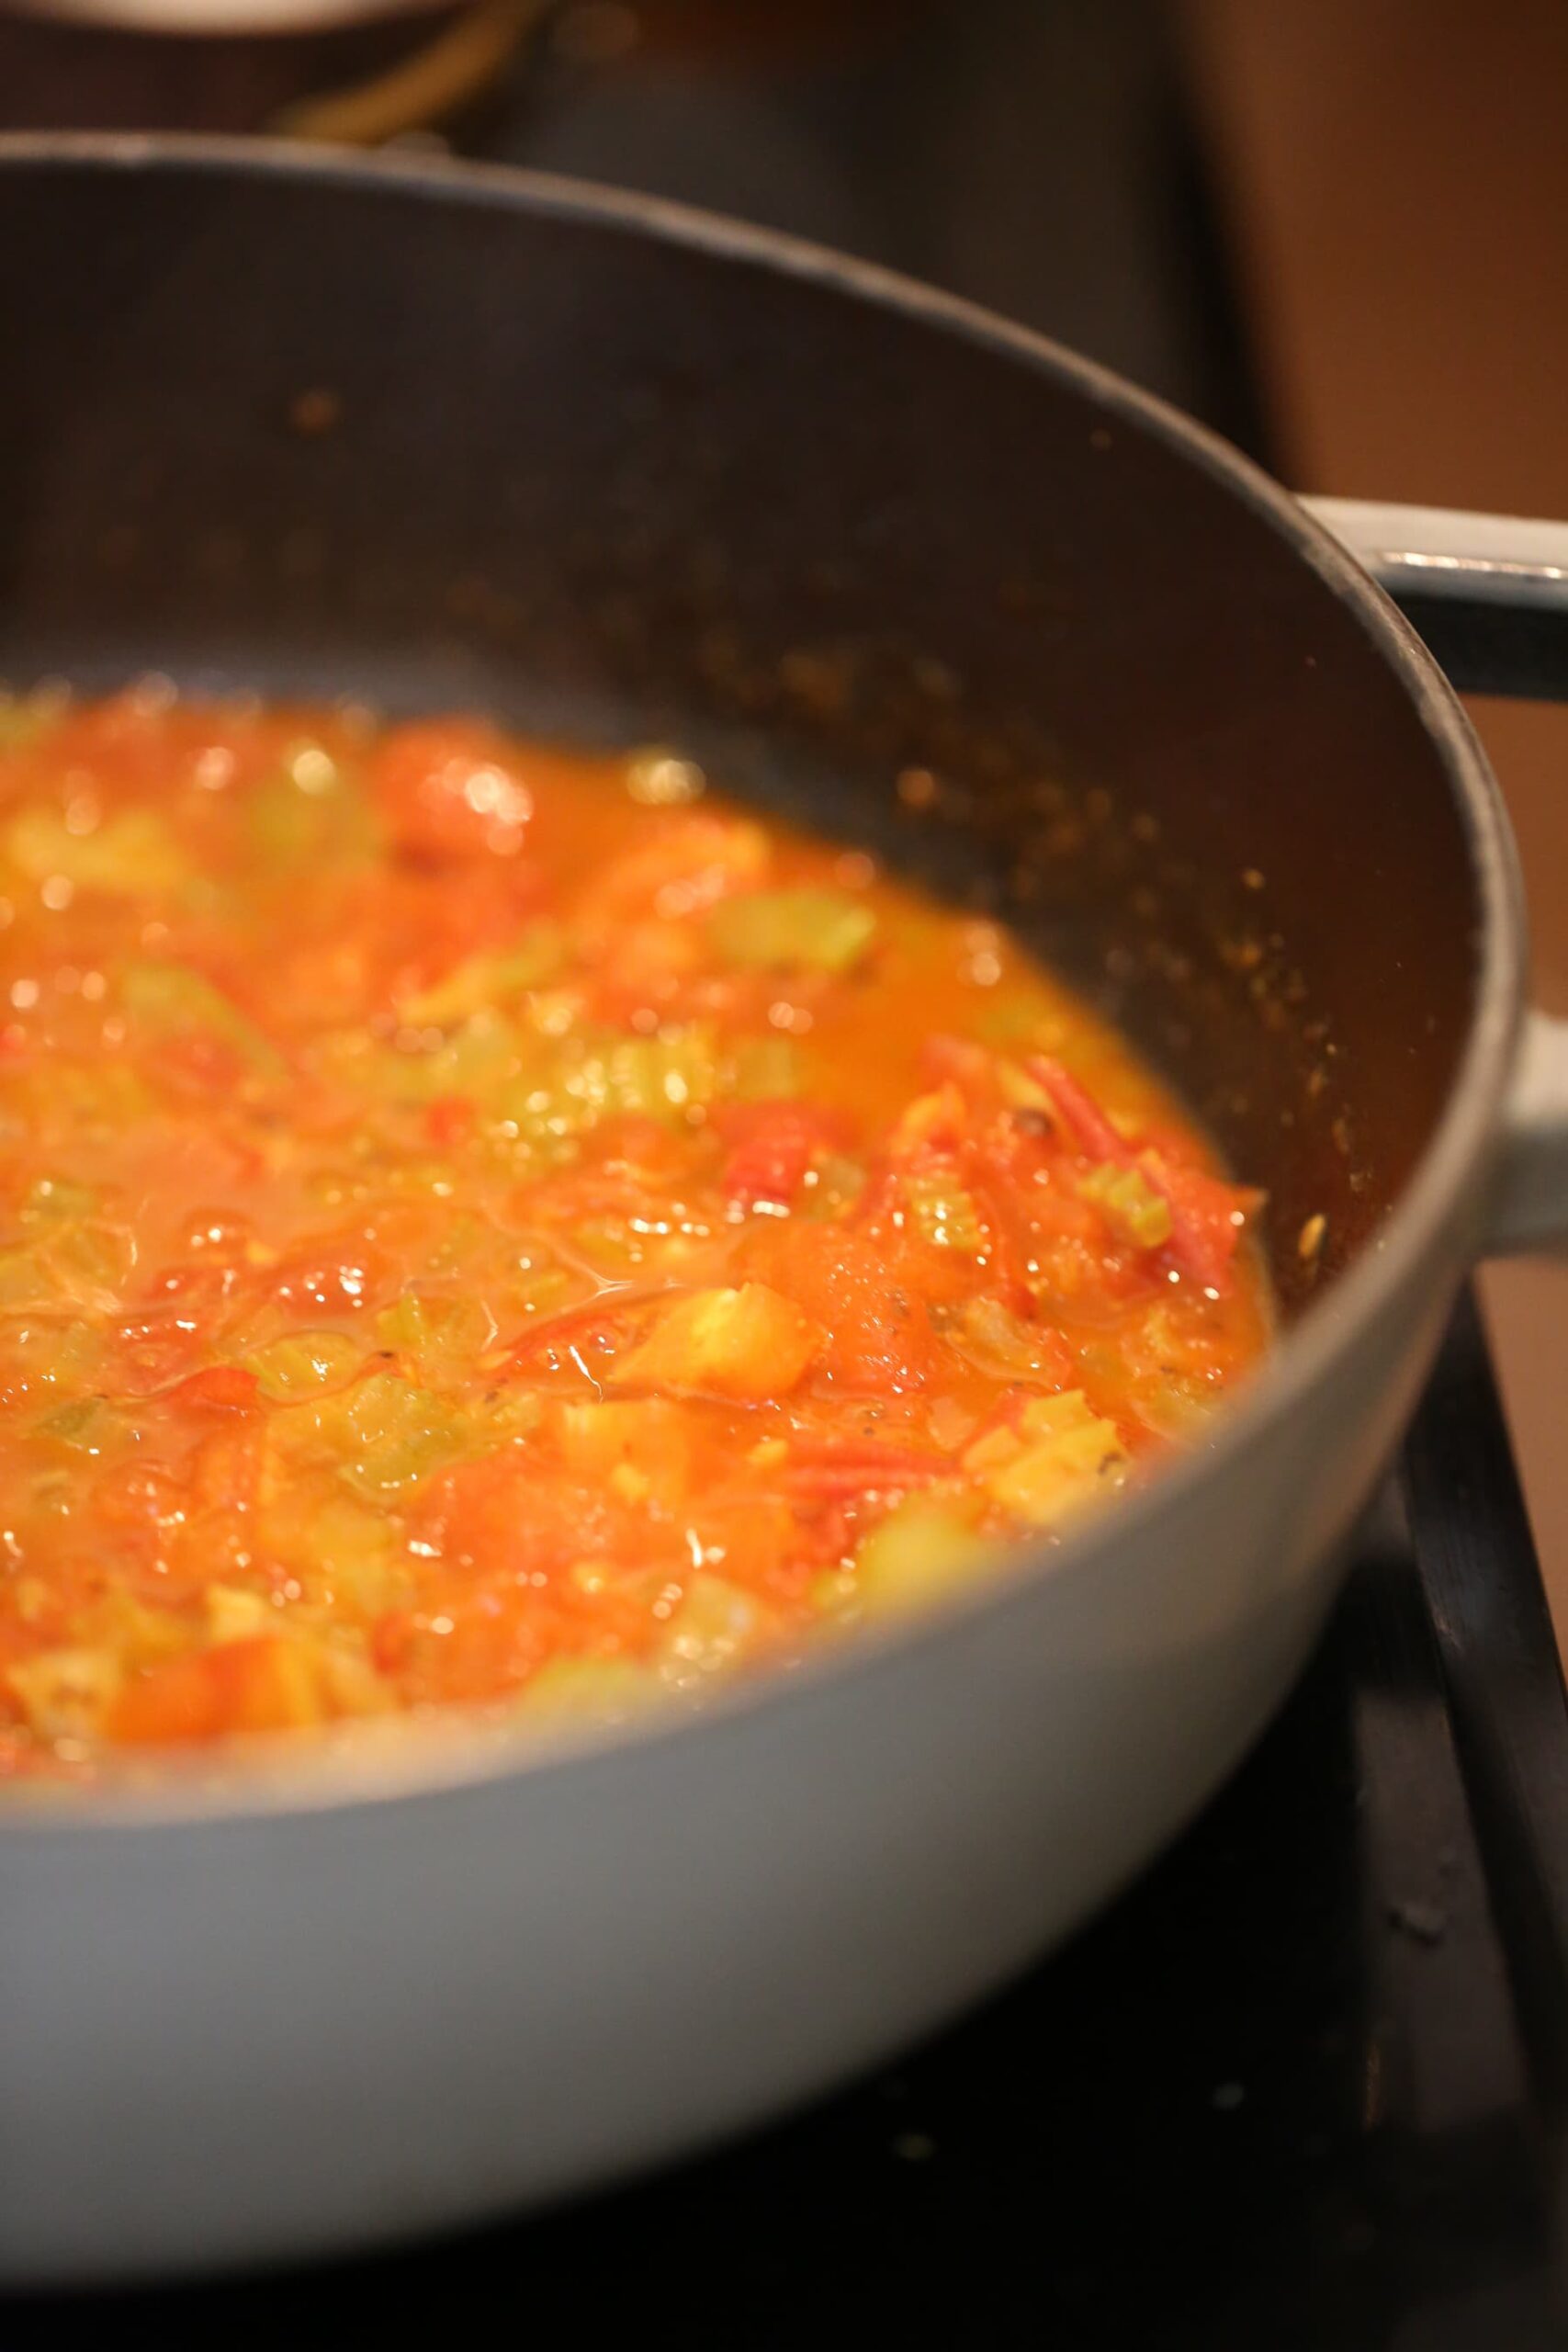
prepare the masala base
- Heat 2 tbsp peanut oil in a pan. Add the asafoetida, and jalapeño, fry for a few seconds then add the chopped celery with a small pinch of salt and sauté until softened – approx 5 minutes.
- Stir in the ginger, turmeric and ground coriander. Cook briefly, stirring well to coat the vegetables in the spices.
- Add the chopped tomatoes, salt, and jaggery. Cook until the tomatoes soften and break down into a slightly thick, mushy mixture – approx. 5 minutes.
blend
- Transfer to a jug and add ½ cup warm water and blend until smooth and velvety. Set aside.
fry the paneer
- Heat 1 tbsp of ghee in a pan and fry the paneer cubes until lightly golden on the edges. Remove and set aside.
bring the dish together
- In the same pan, add ghee. Once melted, add cumin seeds and allow them to splutter.
- Immediately pour in the prepared purée, rinsing out the jug using the ¼ cup warm water (adding more if needed for your desired consistency). Add the peas and simmer for about 5 minutes, longer if using fresh peas.
- Add the fried paneer and yogurt. Stir gently and cook for another minutes, allowing the flavours to meld.
finish
- Stir in garam masala and fresh coriander. Optional: Finish with a generous squeeze of lime juice to brighten the dish.
Garnish with additional fresh coriander and serve warm.

- Categories: dal, rasam & sambar, Indian & Ayurveda, spring, winter

Yasmin and I made these together during her recent trip to Portugal. She baked them often while living in the UK, but their true roots reach back to her childhood. Born in Israel and raised there from the age of twelve, she remembers these cookies being made in a friend’s home—a sweet, familiar scent that has stayed with her ever since. They’re beloved all over Israel.
A tender, shortbread-like crust wraps around a sweet, sticky date filling. Make them plain the first time; after that, feel free to add tahini, nuts, or anything else you love—they welcome it all. A dusting of powdered sugar settles on top like fresh snow. One batch makes 36 cookies, and the recipe doubles beautifully if you’d like to share.
Date spread is easy to find online or in some health food shops. In Portugal, it’s not always available, so I soak dates in hot water and mash them by hand or in a food processor.
avoid overbaking.
These cookies dry out easily, so remove them from the oven as soon as the edges are set.
let them chill for half an hour before eating.
After baking, allow the cookies to cool for at least 30 minutes, then dust generously with powdered sugar.
do not overmix the dough.
Overmixing develops gluten, which can make the cookies tough and dry. Mix only until the ingredients come together.

Yasmin’s date & walnut roll cookies
makes 3 logs (36 cookies)
preparation 30 minutes
baking time 35 minutes
ingredients -dough
200g butter (unsalted) or 1 cup (225g) mild-tasting olive oil, room temperature
4 cups (440g) white spelt flour
2 Tbsp (18g) baking powder
2 Tbsp (25g) sugar (optional)
1 Tbsp (12g) vanilla essence
¼ cup (55g) boiling water
1 tsp (5g) vinegar
date paste
350g (about 20) soft Medjool dates, pitted
¼ cup (55g) hot water
½ tsp cinnamon powder
¼ tsp nutmeg
additional filling
1 cup (100g) walnuts, toasted & roughly chopped
6 Tbsp running tahini (optional)
to finish
icing sugar, for dusting
preparation
- Preheat the oven to 170 °C. Line a baking sheet with baking paper. When the oven is hot, toast the walnuts for 8-10 minutes.
- Place the pitted dates in a bowl, pour in the hot water, and let sit for 5 minutes to soften. (This step is not necessary if using a date spread.)
make the dough
- Add all the dough ingredients to a bowl. Using a spoon, mix well. Knead into a smooth dough. If the dough feels sticky, add extra flour, one tablespoon at a time.
Mixer option: Place all ingredients in a mixer fitted with a paddle attachment and mix until a smooth dough forms, scraping down the sides as needed.
Refrigerate while preparing the filling.
prepare the date paste
- Add cinnamon and nutmeg and mash with a fork until smooth or use a hand blender.
Food processor option: Blend until smooth. Set aside.
assemble
- Divide the dough into three portions. Working with one portion at a time, roll out on a lightly floured surface into a 24 × 30 cm rectangle about 3 mm thick.
- Spread with a third of the date paste, and if using, drizzle over 2 Tbsp tahini and finally sprinkle with a third of the walnuts.
- Using the baking paper to help, roll lengthwise into a tight log. If the dough tears, pinch it back together.
- With a sharp knife, score the log halfway through into pieces about 2cm wide. Transfer to the baking sheet and repeat with the remaining dough.
bake and finish
- Bake for 30–35 minutes, rotating the tray halfway through, until golden.
- Allow to cool, then slice through fully and dust generously with icing sugar.
variation
Instead of the dates, fill or top these cookies with your favourite spread—Nutella, almond butter, chocolate spread, tahini, jam or any other spread you love.
Please enjoy this very amateur video of the making of these delicious cookies. It’s a bit clunky, but I’m working on improving!
Goodness shared from Stacey
- Categories: autumn, cookies, bars & biscuits, sweets, winter

This decadent recipe offers a vegan twist on the classic Hummingbird Cake.
It comes from Cherie Hausler’s A Plant-Based Farmhouse, with just one minor adjustment on my part: I reduced the sugar in the cake from 390 g to 250 g.
The process is split into two steps: first, poaching the quinces, and then preparing the cake itself.
Traditionally, Hummingbird Cake is made with crushed pineapple and cream cheese frosting, but here, a silky tahini caramel adds richness and depth with minimal effort—just heat and drizzle.
Quince
Quince (Cydonia oblonga), a close relative of apples and pears, isn’t great raw, but once cooked it turns tender, rosy, and floral, filling your kitchen with its irresistible aroma.
tips & variations
- If quinces are out of season or hard to find, you can substitute the original pineapple, or use apples or pears instead.
- To add more depth of flavour, use 1/2 cup (120g) of sourdough discard and reduce the flour to 260g.

poached quinces
Quinces have a short season in autumn, but they freeze beautifully, letting you enjoy their floral sweetness all year round. This recipe makes three portions—bake one now and freeze the rest for future cakes.
preparation 30 minutes – an hour
serves approx. 3 portions
ingredients
4 small quinces (614g), washed and cut into quarters, remove the core and seeds
4 cups/820g water
1/2 cup/100g sugar
1 vanilla bean, split in half lengthways
5 green cardamom pods, slightly crushed
optional spices:
cinnamon stick, cloves, star anise
preparation
- Place the quinces in a large saucepan and cover with water. Stir in the sugar, then add the vanilla bean and optional spices. Bring to a boil.
- Reduce heat and simmer for 30–60 minutes, until the quinces are tender and can be pierced easily with a fork. penetrate the fruit.
- Let the quinces cool in the poaching liquid. Reserve the amount needed for the cake, and save the rest for future recipes or reduce it to make a glaze for breads, tarts, or buns.
Once your quinces are ready, you’re all set to prepare the cake.
quince hummingbird cake with tahini caramel
makes 12 mini bundt cakes or a 26cm bundt cake, or 18 baker’s cup cakes
preparation time 30 mins
baking time 30 mins
cake ingredients
375g plain (all-purpose) white spelt flour
250g blond sugar or granulated sugar
1½ tsps/10g bicarbonate soda
1 ¾ tsp/7g baking powder
1 tsp/5g fine rock salt
2 tsp/6g cinnamon powder
480g mashed banana (from about 3-4 large bananas)
90g/⅓ cup + 2 Tbsp neutral-tasting oil
160g/¾ cup quince poaching liquid
1 Tbsp/12g vanilla extract
50g/¼ cup apple cider vinegar
150g/1 cup poached quince, chopped into 1 cm cubes
75g/approx. ¾ cup pecans, chopped
tahini caramel
150g maple syrup
70g tahini
35g extra virgin coconut oil
1 Tbsp/12g vanilla extract
preparation
- Preheat oven to 180 °C (350 °F). Grease 12 mini bundt tins or line two muffin trays with 18 cupcake liners.
- In a large bowl, whisk together the flour, sugar, bicarbonate of soda, baking powder, salt, and cinnamon.
- In a separate bowl, whisk the mashed banana, quince poaching liquid, oil, and vanilla extract. Combine with the dry ingredients until fully mixed.
- Stir in the apple cider vinegar until bubbles form. Fold in the chopped poached quince and pecans.
- Pour batter into prepared tins. Bake mini bundts or cupcakes for 30 minutes, or a large 26 cm bundt cake for 40–50 minutes, until a skewer inserted comes out clean.
- Cool cakes for 10 minutes in the tins, then transfer to a wire rack.
tahini caramel
- Combine all tahini caramel ingredients in a small saucepan over low heat. Stir until smooth and emulsified.
- Let rest for 10 minutes if necessary to achieve a runny-honey consistency.
- Drizzle over cooled cakes, letting it run down the sides. Decorate with flowers or foliage if desired.
storage
Store leftover cake in an airtight container for 2–3 days.
- Categories: autumn, cakes, cupcakes, muffins & scones, sweets
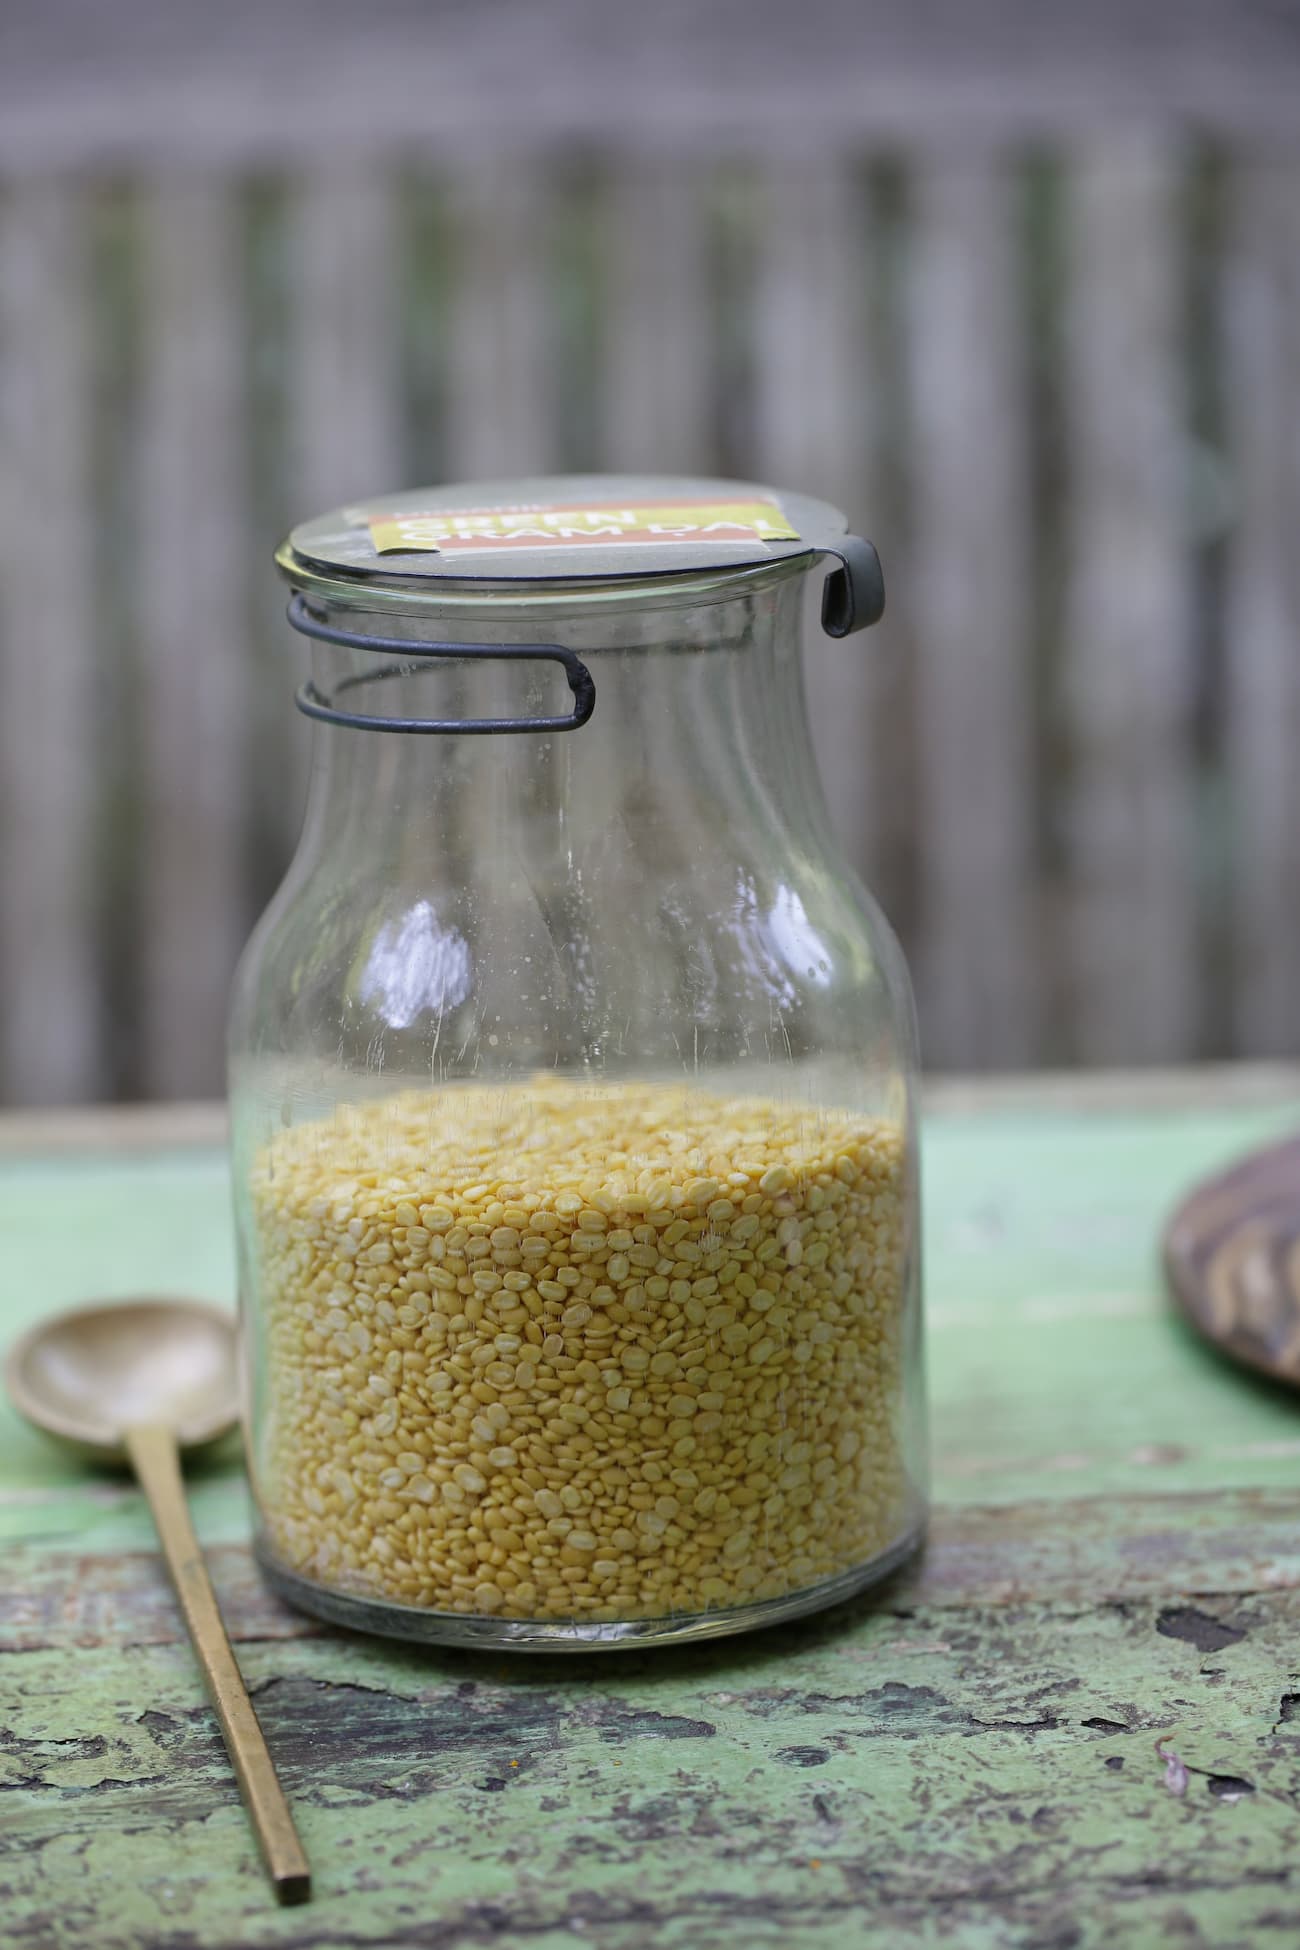
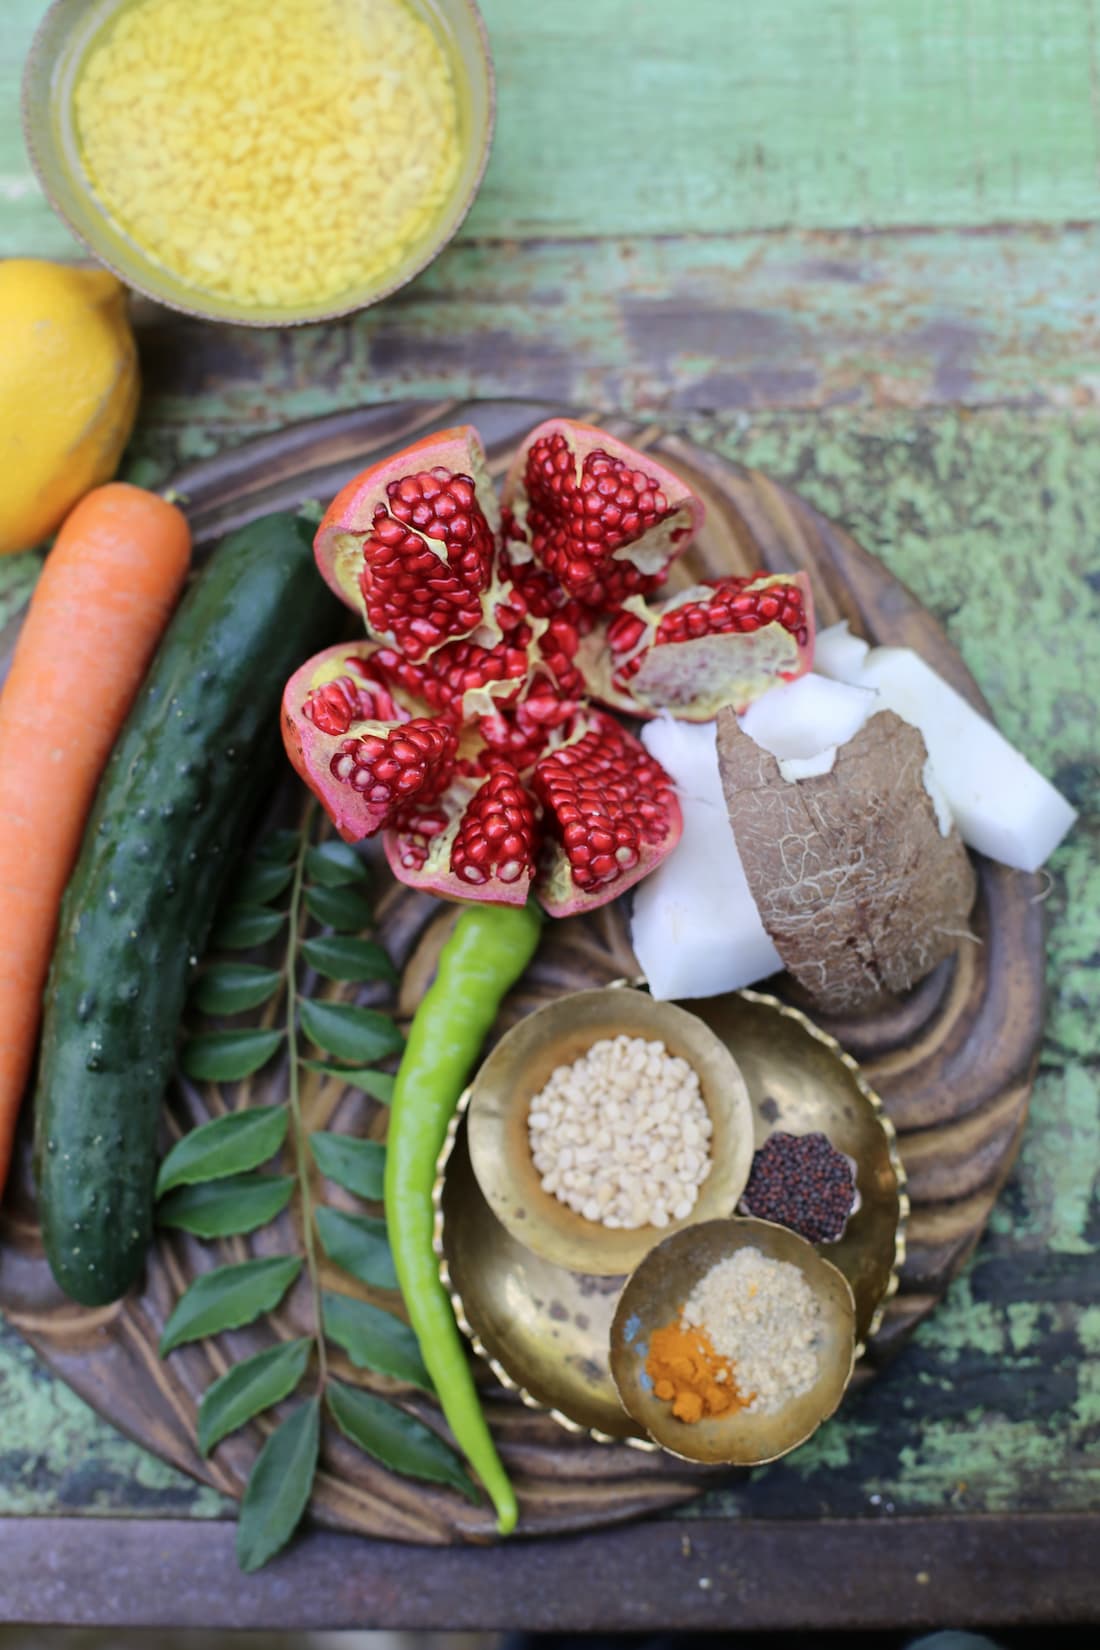
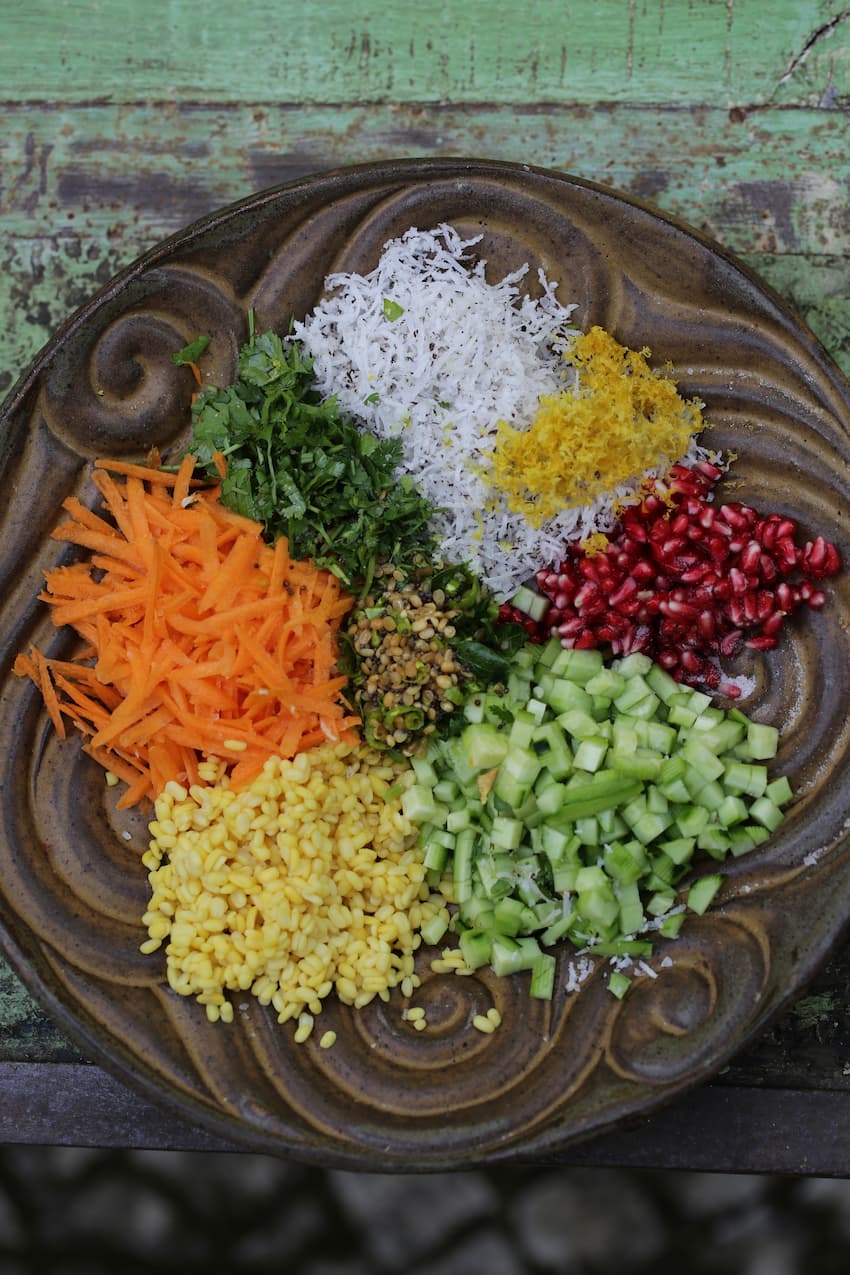
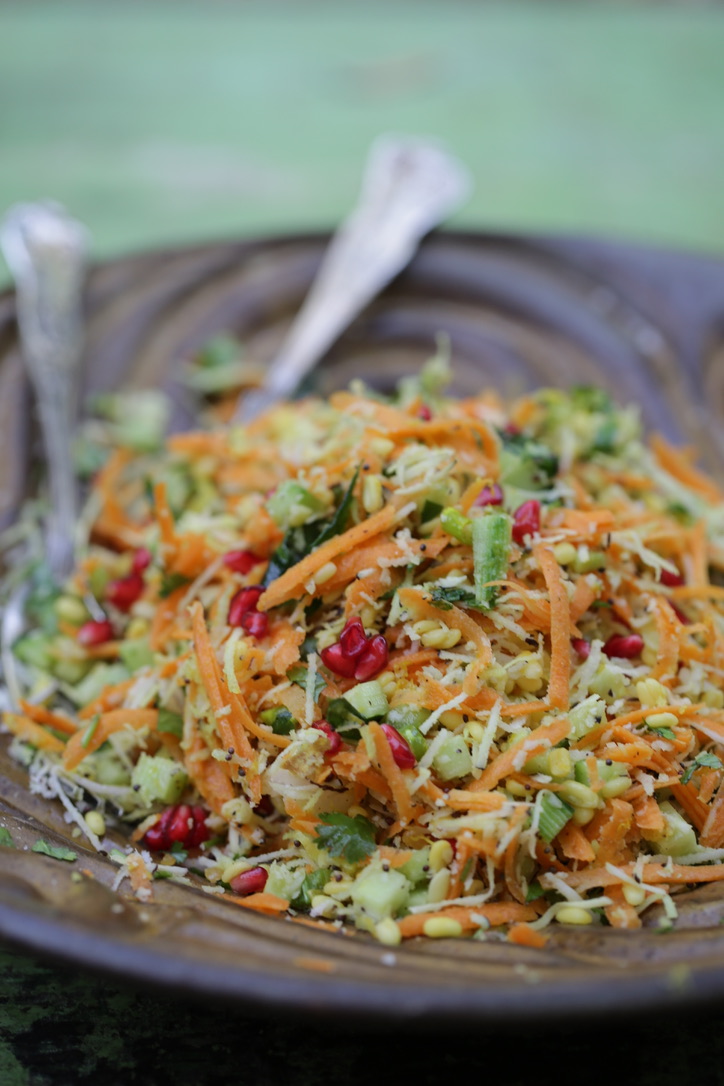
When I’m in India, cosamberi becomes my go-to fresh salad. I enjoy starting my first meal with something crunchy and refreshing. In Portugal, that often means a mix of salad greens or crisp root vegetables from the garden. In India, where tender salad leaves are harder to come by, this simple combination of raw grated carrot and/or chopped cucumber, soaked moong dal, fresh coconut, and a crunchy voggarane (tempering) perfectly satisfies that craving.
two things really make cosamberi shine
The sweetness of freshly grated coconut and the final tempering of spices with a scattering of dal add a delightful crunch to every bite. The only plan-ahead step is soaking the moong dal and grating the coconut — but both can be done while other dishes are simmering away.
what do you serve with cosamberi?
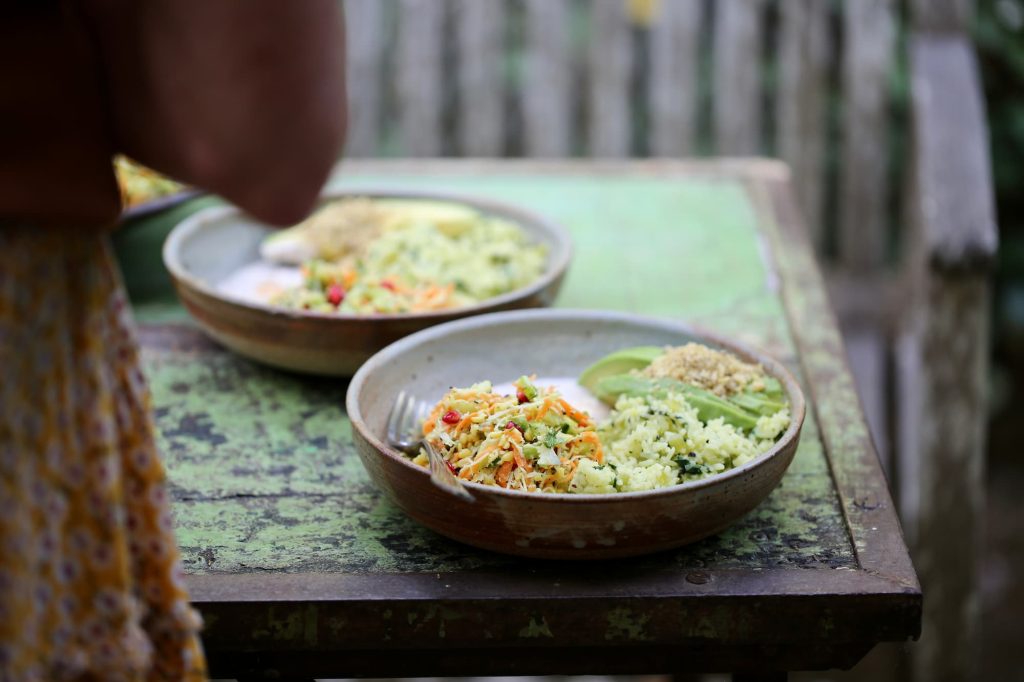
Cosamberi pairs beautifully with lemon rice — I especially love it with green pepper for a subtle twist, alongside creamy avocado topped with a tomato–mustard seed salsa. It’s also lovely served with celery saffron rice with a drizzle of tahini sauce, slices of avocado with a sprinkle of pine nut parmesan as in the photo.
tips for perfect cosamberi
cucumber preparation: Avoid grating cucumber, as it releases too much water. For mini cucumbers, simply chop with the skin on. For large cucumbers, peel the skin, remove seeds, and chop before using.
soaking moong dal: Soak moong dal in hot water for about 1 hour, until it reaches the soft-press stage — tender yet retaining a slight crunch. Avoid substituting with other dals, as this will alter the texture, digestibility, and subtle energetic qualities of the dish.
fresh coconut: One of the main highlights of this South Indian salad is the fresh coconut, which adds both texture and earthiness.
freezing coconut: Leftover grated coconut can be sealed in an airtight container and stored in the freezer.
substitute option: If fresh coconut is unavailable, use ½ cup (35 g) dried shredded coconut instead.
grating tip: For the best texture, grate coconut finely using the fine side of a box grater.

cosamberi
serves: 3–4 as a side dish
pre-preparation: 1 hour
preparation: 15 minutes
Adapted from our teacher, Ganapati Aarya, who shared this recipe as part of the Jivana Yoga Program Ayurvedic recipes.
ingredients for salad
¼ cup/50g split moong dal
1 heaped cup/80 g grated fresh coconut
¼ cup/40g pomegranate arils
1 large carrot (about 100g)
1–2 small cucumbers, (about 120g) chopped into small pieces
1 Tbsp + 2 tsp/25 ml lemon juice, divided
zest from one lemon
⅓ cup/15 g coriander leaves, finely chopped
½ tsp fine rock salt
voggarane (tempering)
2 Tbsp + 1 tsp peanut or coconut oil
½ heaped tsp mustard seeds
1 heaped tsp split urad dal
1 green chilli, seeds removed and finely chopped
15 fresh curry leaves
⅛ tsp asafoetida powder
⅛ heaped tsp turmeric powder
pre-preparation
- Rinse moong dal well, then soak for 1 hour.
- Drain and allow to dry for 15 minutes.
preparation
- Grate the fresh coconut (measure 1 cup).
- Peel, and grate the carrot (measure 1 cup). Toss with 1 tsp lemon juice to prevent discolouration.
- Peel and finely chop the cucumber.
- In a mixing bowl, combine moong dal, coconut, carrot, cucumber, pomegranate, and coriander. Sprinkle with salt—do not mix yet.
voggarane
- Heat oil in a small pan. Add mustard seeds; when they turn grey and pop, add the urad dal and chilli. Fry until the dal is golden-brown.
- Add curry leaves, asafoetida, and turmeric; fry for a few seconds, swishing the pan to ensure even cooking.
- Pour the voggarane over the salad, add the remaining lemon juice, and mix well so colours and flavours blend evenly.
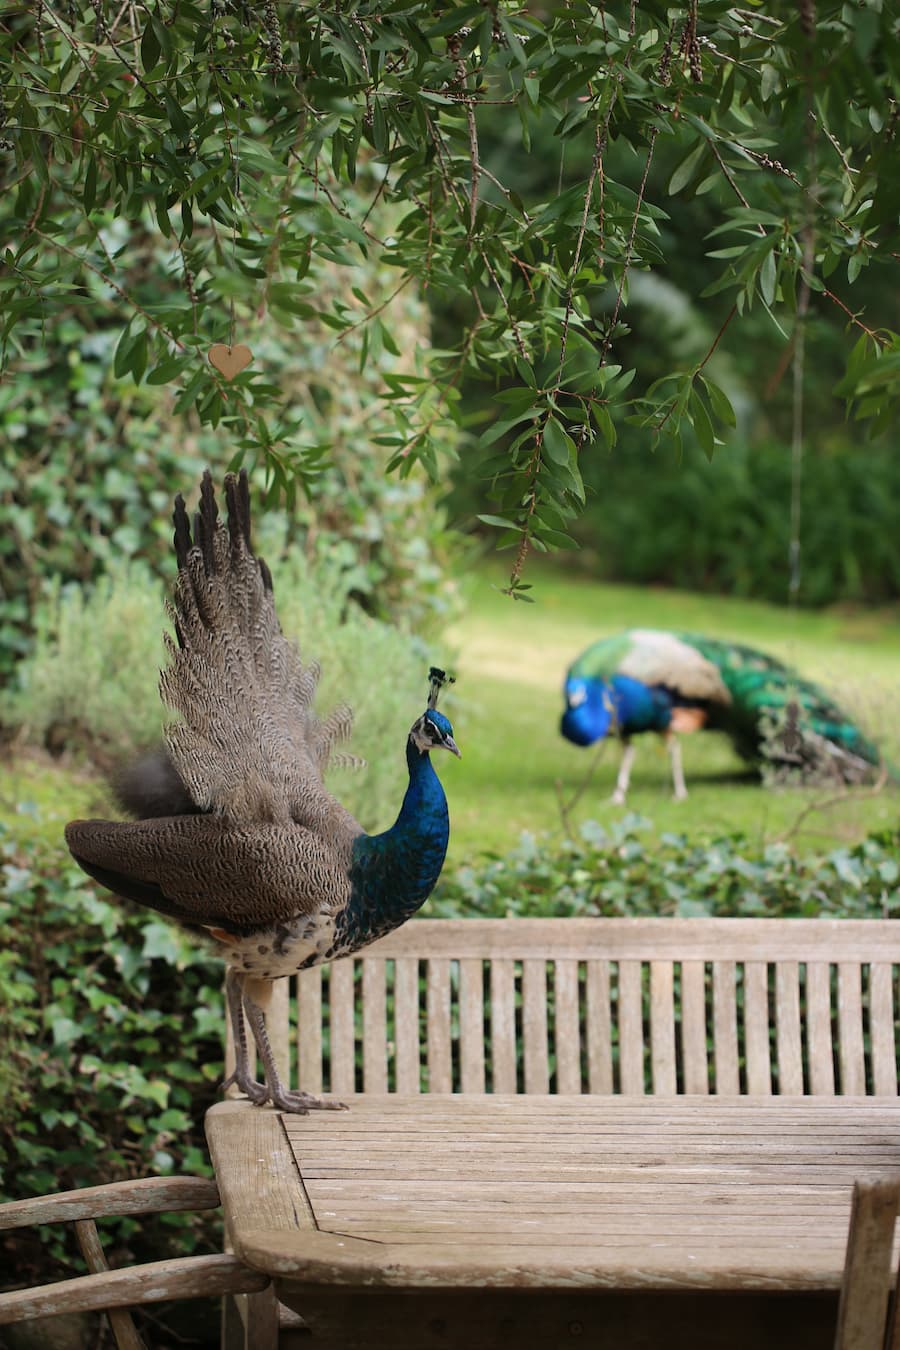
For my birthday, my husband gifted me a family of peacocks. Their presence fills each day with colour and joy. In Indian tradition, the peacock is a symbol of beauty, grace, and divine connection—their call is said to lift the heart toward higher states of happiness.
Goodness shared from Stacey
- Categories: Indian & Ayurveda, indian recipes, salads, summer, vegetables & salads

This dish is a lovely addition to the spring table. The carrots are perfectly tender without being overcooked, and what I enjoy most is the delightful balance of bright, tart, acidic, citrusy, and sour notes that complement the natural sweetness of the carrots. The tahini-yogurt sauce adds a refreshing lemon zing, along with a perfect amount of spice when a few spoonfuls of the coriander sauce is mixed in. Be sure to scoop up some sauce with every bite!
tips
If possible, find small carrots with their greens attached, as they will be sweet and tasty.
Make sure the carrots are all a similar size. If you have a few skinny carrots and a few large, thicker carrots, cut the bigger carrots in half or even into quarters so everything roasts evenly. Thinner carrots will cook more quickly.
Use a traditional, good-quality running tahini.
The addition of fresh pomegranate arils would provide an ideal combination of texture, colour and flavor.
vegan or dairy-free variation
Try using hummus topped with a sprinkle of za’atar. The chickpea base in the hummus adds a good source of protein to the dish.
Do I need to peel my carrots?
You do not need to peel carrots before roasting them. The skin contributes to a beautiful roasted char and is enjoyable to eat. Just scrub the carrots with a vegetable brush under running water.
Don’t Toss Those Carrot Tops!
Carrot greens (the tops of carrots) are edible and can add great flavor to various dishes. They work well in salads, pesto, and soup stocks. Use the leaves for salads, while the tougher stalks are better suited for stock or pesto.
Additionally, carrot greens make a lovely garnish for roasted carrot dishes.
To keep cut carrot tops fresh for salads or garnishes, place the cut ends in a container of water.

sweet roasted carrots with tahini-yoghurt & spiced coriander sauce
The recipe inspired and adapted from here
serves 3 – 4 as a side dish
preparation & baking time 50 minutes
ingredients
550g carrots, sliced lengthways
½ tsp freshly ground cumin
2 Tbsp Olive oil
2 Tbsp maple syrup
Salt
Pepper
Chilli flakes (optional)
for the tahini-yoghurt
150g natural greek yoghurt
¼ cup/60g tahini (runny variety)
Juice and zest of 2 limes (can use lemon)
¼ tsp fine rock salt
¼ tsp freshly toasted ground cumin
spiced coriander sauce
1 bunch/50g coriander
½ cup/15g fresh mint
Juice of one lime and zest
¼ tsp fine rock salt
4 Tbsp/40g olive oil
1 jalapenos (seeds removed depending on spice)
garnish
2 Tbsp toasted black and white sesame seeds
preparation
- Preheat the oven to 200c fan.
- Lay the carrots over the lined baking trays. Season well with olive oil, salt, cumin, chilli flakes and a drizzle of maple syrup and spread them out evenly over the tray – do not overcrowd.
- Roast for about 40 minutes (more or less) until the carrots are caramelised and sticky.
prepare the tahini-yoghurt
- Add the greek yogurt, tahini, juice of one lime and zest, and salt. Mix well and taste to adjust – it should be super limey.
spiced coriander sauce
- Blend the coriander, mint, lime juice, zest, salt, olive oil, and jalapenos in a small food processor until smooth.
to plate
- Smear the yoghurt onto a platter, drizzle 2-4 tablespoons of the green sauce over the tahini and run a spoon through it, drizzle with a bit of olive oil, add roasted carrots and sprinkle with the sesame seeds. Serve the remaining coriander sauce on the side.
Enjoy!
What do you serve with roasted carrots?
This dish makes an excellent side option.
I recommend serving it alongside brown rice or saffron celery rice with a leafy green salad with toasted pine nuts and nigella seeds and a serving of fried marinated tempeh cubes.
to prepare the tempeh
Chop the tempeh into 5mm cubes, heat a generous amount of peanut oil in a pan, and fry until golden brown. At the end of cooking, pour some of this marinade over the tempeh, setting aside the remaining marinade for the meal. Finally, sprinkle sesame seeds on top for added texture.
Goodness shared from Stacey

- Categories: main dishes, grains, vegetables & sides, roasted vegetables, spring, summer, winter

Last year, when we visited Boulder, Colorado, for a dear friend’s wedding, they served sandwiches for us vegetarians—specifically, those of us who don’t eat onion or garlic. The sandwiches were from a local shop where my goddaughter had worked. One combination that stood out was a chickpea salad filling. It was delicious and reminded me of a recipe from an old Moosewood cookbook that I used to make when the children were small. I no longer have the book, but I remember that the most important ingredient was finely chopped raw celery, and I built the recipe from there. When I make our weekly bread, these sandwiches become a quick and easy meal for my husband to take to work.
tips
- Ensure that all ingredients are chopped finely into small pieces.
- When mixing, use a flexible spatula to break up chickpeas and blend the ingredients.
- Cook your own chickpeas for a healthier, tastier, moister result.
Scroll to the bottom for some sandwich-wrapping tips!
how to make your chickpea sandwich filler
prepare dried chickpeas
Soak the chickpeas overnight in ¼ teaspoon of bicarbonate soda. After soaking, bring them to a boil for 5 minutes, then simmer for 1 to 2 hours until cooked. About ¾ cup of dried chickpeas will yield approximately 2 cups of cooked chickpeas.
mash the chickpeas
Add the chickpeas to a large bowl and mash them with a potato masher or a fork. Alternatively, you can use a food processor, but be careful not to over-process; you want to maintain some texture. Add in all your liquid ingredients.
prepare the celery
Start by thinly slicing the celery, as this will be added raw, along with the chilli, pickled cucumber and fresh herbs.
combine everything
Now it’s time to mix! Stir everything together until well combined. Taste and adjust the ingredients: you can add more tahini for creaminess or increase the pickled cucumber or lemon juice for a tangier flavour.
Enjoy!

chickpea celery sandwich filler
Serves 6 – 8 sandwiches
ingredients
2 cups/300g cooked chickpeas (follow instructions above)
zest of full lemon
1 Tbsp/15g lemon juice
¼ cup/55g tahini
2 Tbsp/20g olive oil
1 tsp freshly toasted, ground cumin
4 celery stalks (160g), finely chopped
1 jalapeno chilli, stem and seeds removed, finely chopped
¼ cup/12g finely chopped dill
¼ cup/12g finely chopped parsley
4 small (65g) pickled cucumbers, finely chopped
½ tsp fine rock salt and cracked pepper to taste
few slices of sourdough bread
preparation
- Add the chickpeas to a mixing bowl and roughly mash them using a potato masher. A fork works well, but I like using a potato masher as it’s more efficient.
- Once mashed, add in the zest, lemon juice, tahini, olive oil and cumin. Mix with a spatula until combined.
- Add the celery, chilli, dill, parsley, pickled cucumber, and season with black pepper and salt. Mix until combined. If needed, add more tahini or olive oil, 1 tbsp at a time, until you reach the creaminess you prefer. Taste and adjust for seasoning.
- Chill for at least 30 minutes before serving. Not only does this salad taste best cold, but it also allows for the flavours to meld together and create a richer flavour.
- Spread vegan mayo on both sides of the bread, add a spoonful of chickpea salad, layer with thick slices of tomato and crunchy lettuce, and season with salt and pepper. Enjoy!
other serving suggestions
- As a dip for crackers or vegetables
- Spooned into lettuce cups
- Added to grain bowls or salads for extra protein
how to wrap your sandwich without tape
Use baking paper (parchment paper). Wrapping your sandwich in baking or parchment paper is a good option because the material is porous, allowing your bread to breathe while still keeping excess moisture away.
instructions (video below)
- Start with a 10” x 15” piece of baking paper or parchment paper (or wax paper, butcher paper).
- Place your sandwich in the center. Bring the two short ends together above the sandwich and fold down in 1-inch increments, creasing each fold until level with the sandwich.
- Tug on the folds to snug the paper around the sandwich and press down on the ends.
- Fold one loose end under the sandwich and tuck it into the bottom piece of parchment, tugging on the bottom end as needed.
- Repeat on the other side.
- Tuck the remaining loose end into the fold on the first side and repeat on the second side. You now have an upscale sandwich wrap!
- When preparing sandwiches for a hike, you can cut them in half after wrapping them in paper. Then, place the wrapped sandwiches in a tin to keep air out and make them easy to carry on the go.

The first time I made these scones, I needed something quick to serve with a garden soup. They turned out perfect, and since then, I’ve made them numerous times, pairing them with sweet jam and thick cream or enjoying them alongside soups like the one below. They have a beautifully sugary, crackly crust on the outside and are tender on the inside, with distinct layers that are fun to peel apart while eating.
Our teacher recently emphasized the importance of engaging all five senses to enjoy delicious food fully, and these scones certainly meet that criteria.
If you click the link where the recipe was adapted, you’ll find a helpful video.
if you don’t have buttermilk on hand, use one of the quick methods below:
- ¼ cup/60g yogurt with ½ cup water + 1 tsp vinegar or lemon/110g or
- 2½ tsp vinegar or lemon juice + ¾ cup milk of choice (regular, any nut milk)

flakey buttermilk scones
inspiration here
makes 9 or 12 scones
preparation 20 minutes
baking time 25 minutes
ingredients
2 cups/235g all-purpose flour
¼ cup/50g granulated sugar
1 Tbsp/10g baking powder
¾ tsp fine rock salt
7 Tbsp/100g unsalted butter (place in the freezer for 10 minutes)
¾ cup + 2 Tbsp/190g buttermilk
melted butter and flakey salt (both optional) for finishing
preparation
- Preheat the oven to 200C/400F using a fan and line a large sheet pan with parchment paper.
- Coarsely grate the cold butter onto a plate, then freeze until cold and hard, at least 10 minutes. Meanwhile…
- In a large bowl, whisk together the flour, sugar, baking powder and salt. Add the butter to the dry ingredients. Using a spoon, toss together until all of the butter is coated with flour.
- Add half the buttermilk and toss with a spoon. When incorporated, add the rest of the buttermilk and gently toss again, without mashing together or overmixing, until the dry ingredients are lightly hydrated throughout. The mixture will be crumbly.
- Flour a clean surface and dump the mixture directly onto it. Using your hands, gently press the crumbs together, and then use a floured rolling pin to roll the mass gently but firmly into a 1-inch-thick rectangle.
fold the dough in half
- Using a bench scraper, lift the top half off the surface and fold it over the bottom half. This step may be crumbly and messy at first, but go for it and fold what you can down from the top. Repeat this roll-and-fold motion five times, flouring the surface and dough as needed and using the bench scraper to straighten the edges as needed. The dough will come together as you roll it. Rotate the mixture after each fold to create a square.
build the final layer
- Fold the dough in half one last time, then roll to about 1½ inches thick to create a 6-inch square, using the bench scraper to straighten the edges.
- Using the bench scraper or a sharp knife, cut straight down into the square to create a 4-by-4 grid of 12 squares or a 3-by-3 grid of 9 squares. Then, place them on your sheet pan, upside down if you’d like taller biscuits.
- Bake for 25 – 30 minutes, rotating the pan halfway through, until risen, golden brown on top, and slightly pale on the sides. Don’t worry if a couple of the biscuits tip over or if the melted butter pools underneath. Brush the tops with melted butter and sprinkle with flakey salt.
CELERY SOUP with thyme and parsley
recipe inspired by Nigel Slater
A comforting soup that can be kept slightly rustic or blended into a smooth purée according to your preference. I enjoy leaving a few unblended celery and potato pieces in the mix. Serves 4 and is ready in 40 minutes.
ingredients
potatoes 2, large
celery 1 medium head (about 400g)
ghee or butter 60g
fresh bay leaves 2
thyme leaves 1 big sprig
parsley 10 bushy sprigs
vegetable stock or water 1.5 litres
preparation
- Scrub and roughly chop the potatoes.
- Remove six tufts of bushy celery leaves and set them aside for later. Trim the root end and any dry tips from the celery stalks, then discard them. Roughly chop the ribs and attached leaves of the celery.
- In a deep saucepan, melt the ghee or butter over moderate heat. Stir in the potatoes and chopped celery, then partially cover the pan with a lid. Cook until the vegetables soften and lightly toast without browning.
- Stir in the sprig of thyme and a generous grinding of black pepper. Roughly chop the parsley and add it to the saucepan. Continue cooking for about 10 minutes, until everything is soft.
- Pour in the water or vegetable stock and bring it to a boil. Lower the heat, keep the pan uncovered, and simmer for 25 minutes.
- Season to taste with salt, remove the thyme sprig and bay leaves, then use a hand blender to blend the soup a few times for a rustic texture.
- When ready to serve, drizzle with ghee, and enjoy with flakey scones.
- Categories: bread, cupcakes, muffins & scones, soups, winter

These delightful sesame balls are light, not overly sweet, refreshing, and nourishing after a meal. The combination of orange zest and cardamom is heavenly. They are also a perfect way to use the almond pulp from making almond milk.
tips
- Grind your cardamom, as the taste is so much more fragrant.
- You can use any type of sesame seeds, but it is preferable to choose tan seeds instead of white ones. The white sesame seeds found in supermarkets are often hulled, and may even be bleached. I don’t recommend them because the hull helps preserve the oil inside, preventing it from becoming rancid.
- When you’re ready to serve, slice the orange you just zested into quarters. It is so refreshing when served with these sesame balls.
- I like keeping these in the freezer for a cold, refreshing bite!

maple orange sesame bites
makes 12 balls
preparation 20 minutes
Recipe inspiration found here
ingredients
¾ cup/100g sesame seeds (divided – ¼ cup of this will be used for coating the outside)
⅔ cup/60g almond meal (or almond pulp from your almond milk)
¾ tsp freshly ground cardamom seed
½ tsp vanilla extract
1 Tbsp orange zest (one orange)
¼ cup/75g maple syrup or honey
1 Tbsp melted coconut oil
pinch fine rock salt
preparation
- Toast the sesame seeds lightly on low heat until golden brown, stirring frequently to prevent burning. Set aside to cool. Once cool, remove ¼ cup for coating the balls.
- Grind all the ingredients into a rough dough in your food processor, scraping down the sides halfway through. It will be a little clumpy but should hold its shape.
- Roll into balls, approximately 20g each; you should have 12 balls. Coat the balls with more sesame seeds—place in the fridge or freezer to set for 1 hour.
Enjoy!
- Categories: energy balls/bites, spring, sweets, winter

When I make my weekly batch of ghee, I use some of it to bake cookies. These cookies are ideal for cooler autumn days because the combination of browned butter (ghee) and cornmeal gives them a delicious, deep, and rich flavour, reminiscent of the best cornbread but in cookie form. Just so you know, these cookies are not crunchy.
I enjoy cookies, but I don’t bake them often because if I do, I’ll eat them, and I don’t need to eat cookies all the time! That’s why these small-batch cookies by Edd Kimber are perfect. They yield 6 – 7 cookies at a time, which suits the two of us perfectly for a sweet treat after a meal.
tips
- For a perfectly round cookie, use an ice cream scoop that is perfect for portioning out equal balls of cookies.
- When the cookie comes out of the oven, it is soft and still pliable. If you scoot a cookie cutter or a deep lid slightly larger than the cookie, it will neatly round the edges, turning into a perfectly round cookie!

brown butter cornmeal cookies
makes 7 cookies
preparation 30 minutes
ingredients
⅓ cup/75g ghee or unsalted butter
¼ cup/50g granulated sugar
1 heaped Tbsp/25g maple syrup
¼ tsp vanilla extract
1 flax egg (1 Tbsp/7g ground flax seeds + 3 Tbsp/30g hot water
½ cup + 1½ Tbsp/75g all-purpose flour
⅓ cup + 1 Tbsp/60g fine cornmeal (polenta)
¼ tsp bicarbonate of soda
¼ tsp baking powder
¼ tsp fine rock salt
preparation
- Preheat the oven to 180C (160C Fan) and line a baking sheet with baking paper.
- If you haven’t just made a batch of ghee, then we need to brown the butter. Add the butter to a small saucepan and place over medium heat. The butter will splutter and splatter as the water content cooks out, but once settled, it will start to foam. Watch carefully for the milk solids to turn the butter a nutty brown.
- Pour the butter into a bowl with the sugar, maple syrup, flax egg and vanilla, mixing briefly to combine. Set aside to cool for 10 minutes.
- Add the dry ingredients to the brown butter mixture and mix to form a uniform cookie dough.
- Using a 3 Tablespoon cookie scoop, form the dough into seven equal balls on the prepared baking sheet. If you don’t have an ice cream scoop, scoop with a spoon, then roll with your hands.
- Bake the cookies for about 12 minutes, rotating halfway through baking until set and edges are lightly brown. Remove and set aside for 5 minutes before transferring to a wire rack to cool completely.
- Categories: autumn, cookies, bars & biscuits, sweets

This cheesecake is exceptional!
It is based on this Lime cheesecake recipe but uses passionfruit as the base instead of lime. Cause, let’s face it, who doesn’t like passionfruit? And there are so many still in the markets.
The original recipe is from Addicted to Dates and can be found here, where you can find step-by-step photos, tips and more inspiration.
I like to serve it with extra passionfruit pulp squeezed on top for a yummy, light, tropical summer treat!
Scroll down to find a gluten-free coconut crust that is perfect for Passover!
tips
- First step, soak your cashews before making the passionfruit curd.
- You can prepare the passionfruit curd the day before and refrigerate it until ready to use. When making this the day before, gently warm it in a heat-proof bowl for a looser consistency. Do not apply direct heat to the curd, as you risk burning it.
- When buying passion fruit, the ripe fruit should be firm and heavy, with wrinkled skin and a little “give.” If the skin is not deeply wrinkled but only shrivelled and unappealing, keep the fruit at room temperature until it is.
- Use vegan block-style butter, which is not spreadable. I use the VioLife brand for both the butter and cream cheese. It is important to use extra-creamy Violife vegan cream cheese or replace it with regular cream cheese.
- If you have setting problems with the vegan cream cheese, place it in the freezer to set for a frozen treat.
passion fruit curd
This recipe makes the perfect amount needed for the cheesecake. It is an easy 5-ingredient passion fruit curd, used in the cream cheese filling and topping the cake.
preparation 30 minutes
serves approx. 2 cups
ingredients
1 cup/240g passion fruit pulp (approx. 14 small passion fruit)
½ cup/100g granulated sugar
½ cup/110g non-dairy milk
4 Tbsp/40g cornstarch
½ cup/60g vegan butter, block style, cold, and cut into cubes
preparation
- Slice the tops off the fruits and squeeze the pulp and seeds into a food processor. Blitz for 30 seconds; the juices will separate from the seeds. Pour through a fine mesh sieve to separate the seeds from the pulp. Optional: Reserve 1 Tbsp of the seeds to add back into the curd after adding 120g to the cream cheese filling.
- Place the pulp and sugar in a medium saucepan and bring up to a simmer, whisking often.
- Whisk the cornstarch and non-dairy milk in a bowl to form a paste.
- Add the cornstarch slurry to the passionfruit mixture. Cook on medium heat and continue whisking for 3 – 5 minutes until it thickens. Remove from heat once thick enough to not run off the back of a spatula. Whisk in the butter. Allow to cool slightly, and cover the surface with plastic wrap; this prevents it from forming a skin on top.
You are ready to prepare the cheesecake.

passion fruit cheesecake
makes one 9-inch loaf pan
serves 8 portions
equipment – high-speed blender
preparation time 30 mins
chilling time 3-5 hours
make-ahead
1 batch passion fruit curd—divided (recipe above)
biscuit crust
150g digestive biscuits
1 tsp ground ginger powder
½ tsp fine rock salt
50g unsalted vegan butter (block style)
cream cheese filling
150g/ approx. 1 cup plus 2 Tbsp cashews, soaked in hot water for 30 mins
200g vegan cream cheese (Violife extra-creamy) or regular cream cheese
80g vegan Greek-style yoghurt
3 Tbsp/30g coconut oil
1 tsp vanilla bean paste or 1 Tbsp vanilla extract
1 tsp lime zest (optional)
¼ cup/70g agave or maple syrup
pre-preparation
- Quick-soak the cashews in boiling water for 30 minutes. Line the base and sides of a 9-inch loaf pan with parchment paper. Leave some overhang to help lift the set cheesecake out of the tin.
prepare the biscuit crust
- Place the biscuits, salt, and ginger powder in a food processor and blitz for 1 minute. (If you don’t have a food processor, place the biscuits in a plastic bag and bash them into crumbs). Add the butter and blend until the mixture sticks between your fingers. Press the crust into the base of the pan and smooth it down with your fingers or spoon – make sure it is compact. Place in the fridge while you make the filling.
prepare the cream cheese filling
- Add 130g/½ cup of the passion fruit curd to a high-speed blender with the other filling ingredients. Blitz until smooth and creamy and without lumps. Pour the filling into the pan and refrigerate for 3-5 hours or overnight until set.
passion fruit topping
- Add the remaining passion fruit curd to a saucepan and gently heat while stirring so that it becomes a spreadable consistency. Top the cheesecake with the curd, smoothing it out with the back of a spoon. Refrigerate for 1 hour until set.
serving and storage
Decorate with edible flowers and serve with extra passion fruit pulp. Once set, run your knife under boiling water and wipe after every cut with a paper towel. This will give you sharp, professional-looking slices.
12 individual cakes (note to self)
passionfruit curd x 2
biscuit base x 1 and a half
cream filling x 2

Gluten-free coconut crust
This crust is a great recipe for Passover or for use in any refrigerated cream or fruit pie!
preparation 15 minutes
ingredients
2 cups/160g unsweetened dried coconut
4 Tbsp/60g vegan block butter
preparation
- Preheat oven to 180C (350F)
- In a food processor, combine the dried coconut and melted butter. Pulse the mixture until the coconut is finely chopped and it resembles a dough that can be easily pressed together. You should still see small flakes of coconut, but they should be much smaller than before.
- Pour the coconut mixture into your lined pan and press it evenly on the bottom.
- Bake for 13 minutes. You want the crust to be golden but not dark or totally at all, or it will be too crisp when you cut it.
- Remove from oven and let it cool before adding the filling.
notes
- For the best results, I recommend using unsweetened coconut for the crust. Sweetened coconut may burn quickly in the oven. I’m sure it’s possible to make it with sweetened, but you’ll want not to take your eyes off the crust while you bake it.
- The crust should hold together well and not break when you cut into it, as long as you haven’t overbaked it.
- This coconut crust is also great for other refrigerated cream pies, and it would be delicious with this lime cheesecake.