


I always look forward to sharing this bread when the four of us are together, especially if we are lucky enough to have our family or friends join us on these Friday nights. This is where we savour the opportunity to pause, bless, and reflect on the week just passed and to light the candles as a reminder of that inner light inside us. What is left over, we spend the weekend eating with all sorts of delicious spreads.

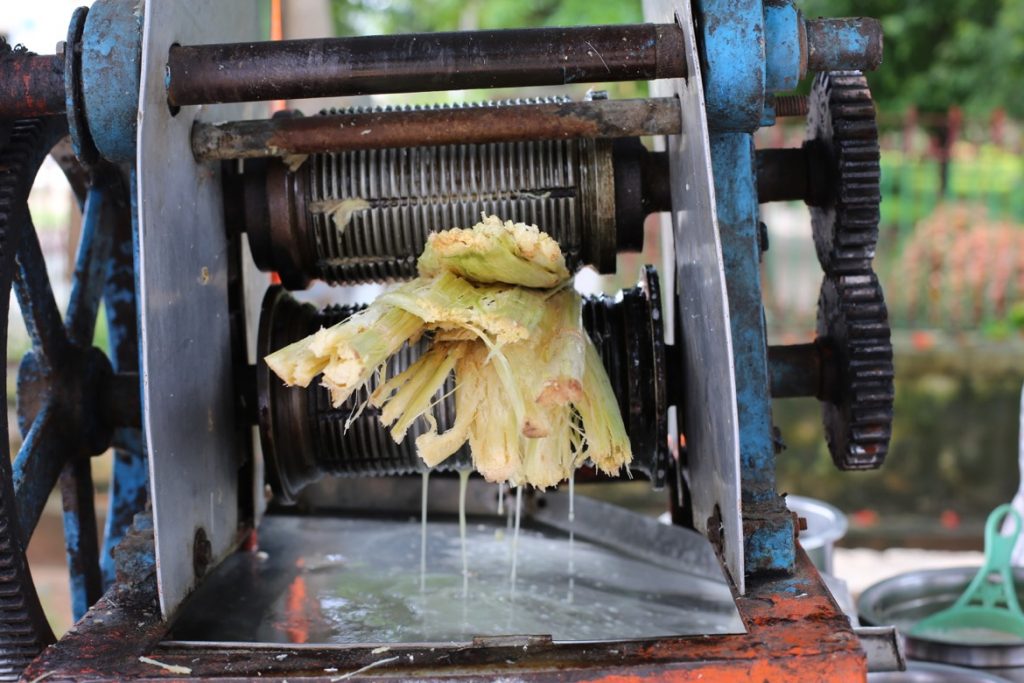


Freshly pressed sugar cane juice – Mysore, South India.
variation
- Replace the wheat flour with spelt; you may need to reduce the amount of liquid used.
- Follow this recipe to make small individual challah rolls.
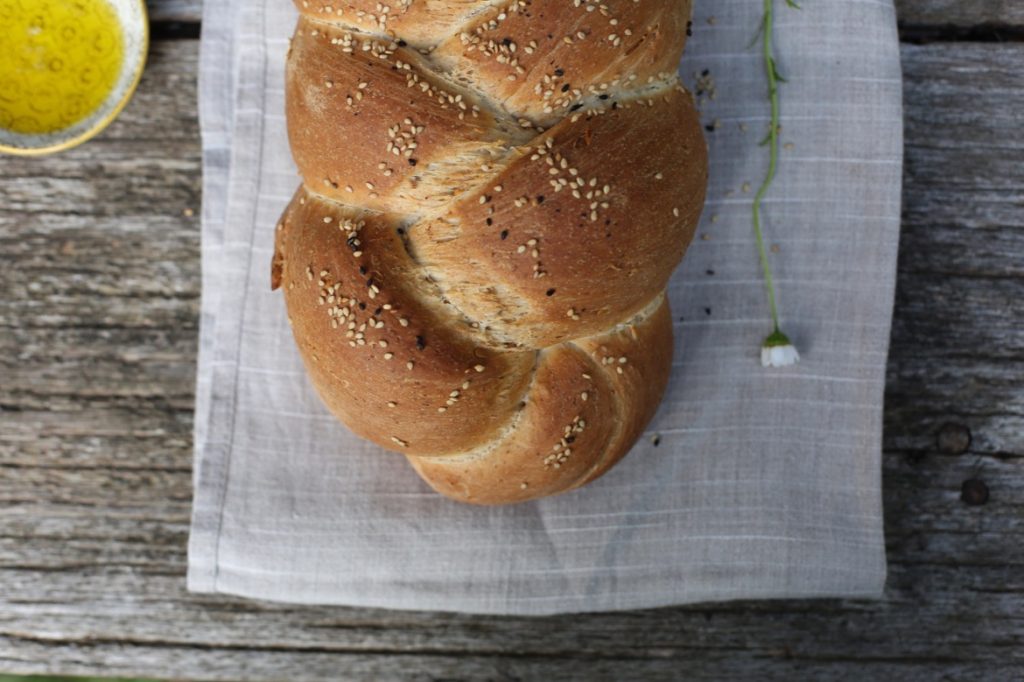
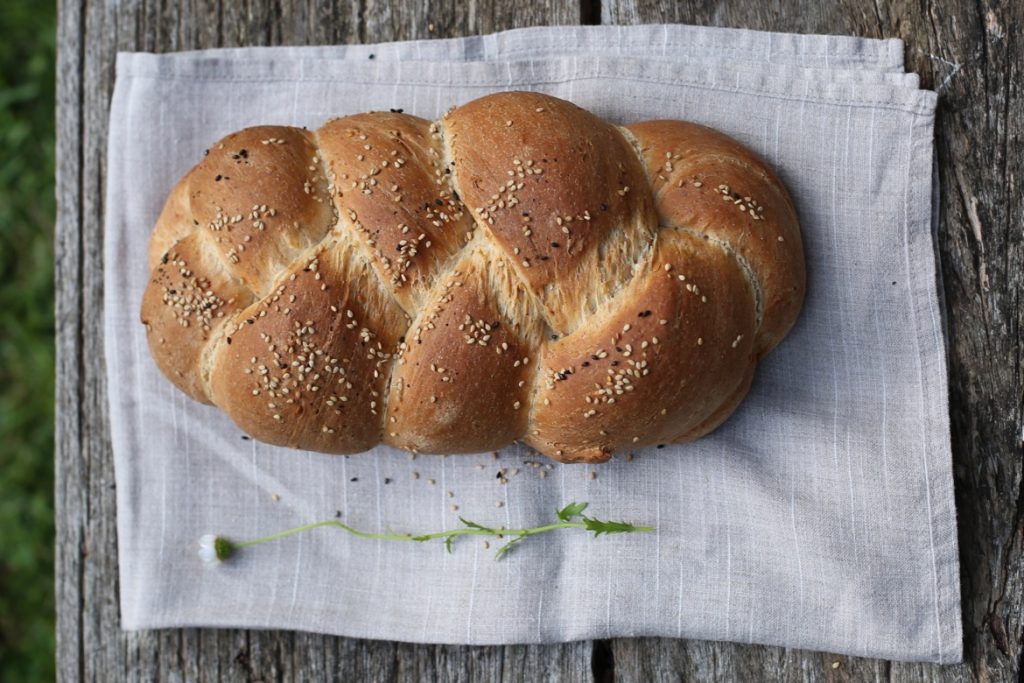
homemade challah
preparation 2½ hours
baking time 35 minutes
Makes 1 large, challah or 2 small.
The recipe uses a mixer with a hook dough, but you can easily use your hands.
ingredients
2 Tbsp/20g flaxseed, plus 6 Tbsp/80g water
1 cup + 2 Tbsp/246g warm milk or almond milk
60g butter – room temperature or 6 Tbsp/60g olive oil
1 Tbsp active dry yeast
1¼ cups/150g wholewheat flour
2¼ cups/350g regular all-purpose flour
¼ cup/40g light brown sugar/coconut sugar
1½ tsp fine rock salt
preparation
- In a bowl of a stand mixer fitted with the dough hook attachment, whisk together the flax seeds with six tablespoons of water. Allow to sit for 10 minutes.
- Add the warm milk, butter/oil, and yeast and leave undisturbed until the mixture is foaming, about 5 – 6 minutes.
- Measure the flour, sugar, and salt, whisk together, and add to the yeast and milk mixture. Turn the machine on the lowest option and knead on medium speed for about 5 – 10 minutes. The dough should be elastic and smooth. If it seems too sticky, add more flour, a tablespoon at a time, or if it looks too dry, add more liquid, a tablespoon at a time.
- Cover with a damp tea towel and allow the dough to sit in a warm place for 1 – 1½ hours until well-risen and doubled in size. The longer it sits, the better the final bread. I usually prepare the dough in the early morning and let it sit until about 1 o’clock when I come back from errands.
- Take out the dough, knead a little with the heel of your hands and work it into a ball.
plaiting the dough
- Divide the dough into three equal pieces with a sharp knife or bench scraper. Using your palms, starting from the centre and working outward, elongate one piece by rolling it gently against the work surface with even pressure until you have formed a rope of the desired length. Repeat with the remaining two pieces.
- Place the three side by side, pinch together the top ends, and carefully braid the three, like you would if you were braiding or plaiting hair. As I braid, I gently pull them length-wise to keep them as even as possible. Pinch together the ends and tuck them slightly under.
- Transfer the plaited loaf to the baking tray, brush with ghee/oil, and sprinkle with poppy and sesame seeds.
- Cover loosely with an oiled plastic wrap or a damp tea towel and set in a warm place to rise for 1½ hours.
- About 15 minutes before the dough has finished rising, preheat an oven to 180C/350F. Remove the plastic wrap or towel and bake for 35 minutes or until golden brown. Allow to cool completely before cutting into it.
When it is just the four of us, we have been enjoying the challah with a simple vegetable soup, a salad, a bowl of guacamole, and, for dessert, challah slathered with homemade strawberry jam.
Goodness shared from Stacey


Within a day of moving into our new home, I planted a small herb garden just next to the back door; it contained coriander, parsley, sage, thyme, and all the essentials, plus 12 kale seedlings, which I had been growing on the window sill in the old house. I am so glad I did, as it’s been a vital addition to quick meals, and those kale plants have been growing wild and wonderful. This is where the parsley came from. The main vegetable garden is quite a walk away from the house, so it is helpful to have a small garden that is close to the house for emergencies.
This pesto is one I make weekly for pasta lunches for school and quick sandwiches for my young adults. It goes nicely with a minestrone, a favourite with my daughter, and part of easy dishes which she can prepare herself – recipe soon.


~ Cosmos (Coreopsideae )
~ Cosmos is a Greek word meaning harmony or balanced universe.
variation
When I am a bit low on the essentials, I change the recipe, adding a mix of pine nuts, walnuts, basil, and parsley—or whatever I have in the garden.

walnut parsley pesto
preparation 20 minutes
makes 1½ cups
Inspired by Gillian and Paul.
ingredients
¾ cup/80g whole walnuts
2 big bunches/90g parsley – rinsed, bigger stems removed
½ cup olive oil
¼ tsp fine rock salt
⅛ tsp freshly ground pepper
¼ cup/20g grated parmesan or nutritional yeast
extra olive oil for sealing the pesto
to serve
a tray of roasted cherry tomatoes, red pepper, pumpkin with rosemary and sage
golden crusted brussels sprouts
preparation
- Preheat the oven to 180C/350F. Place the whole walnuts on a tray and roast for 10 minutes. Set aside to cool.
- Wash the parsley, dry it, and remove the larger stems. Place the leaves and smaller stems in a food processor with the ‘S’ blade attached, along with the walnuts, olive oil, salt, and pepper.
- Blend until all are broken down – using a spatula to wipe down the sides.
- Add parmesan and blend until well incorporated – adding more oil if needed.
- Store in a jar, with a layer of olive oil on top to exclude the air, and refrigerate until needed for up to two weeks. Level the surface each time you use it, and recover the pesto with olive oil.
It is delicious served with homemade pasta.


For everyone who has joined us for pasta night!
Sunday night is pasta night and it has become a regular tradition for us for years. We cook a lot of Indian food, so our children requested to have a “normal” non-Indian meal at least once a week! It all started as a special weekend dish that my husband would cook, and slowly, my son started helping out by chopping vegetables. Now, he is in charge of making the pasta sauce. We have also started having focaccia regularly with our pasta, and recently, I have been making my own pasta.


~ Marigold (Tagetes patula flowers). The genus name for marigold (Tagetes) comes from the Etruscan god ‘Tages’—the god of wisdom. Its common popular name, ‘marigold’, comes from “Mary’s gold” after Mother Mary. In Hinduism, too, the flower symbolizes auspiciousness. The saffron/orange colour signifies renunciation and is offered to God as a symbol of surrender.
Marigolds’ odour and root hormones scare many animals and insects from the garden. They are often used in companion plantings for tomatoes, eggplants, chilli peppers, and potatoes.

sunday night pasta sauce
preparation 2 hours
serves 6 – good for 500g pasta
ingredients
⅓ – ½ cup peanut/olive oil or to generously cover the base of a large saucepan
¼ heaped tsp asafoetida powder
1½ cups/155g celery
2 heaped Tbsp ginger, finely chopped
2 cups/220g carrots
1½ cups/125g red bell pepper
1 x 140g tube tomato paste
1.5 kg/16 medium plump Roma tomatoes
3 heaped tsp fine rock salt
3 heaped tsp jaggery
to serve
half portion home-made vegan pasta
bowl steamed broccoli & kale, or grilled zucchini slices.
preparation
- Wash the vegetables and finely chop the celery, ginger, carrot, and red pepper. Set aside in piles on a chopping board. Cut the base off the tomatoes and cut each tomato into quarters. Set aside.
- Over medium heat, pour the oil to fill the base of a large pot. Add the asafoetida powder and fry for 30 seconds. Then add the celery and fry until the celery starts to soften. Add the ginger and carrot and simmer for 3 – 4 minutes.
- Add the red pepper and simmer for 3 – 4 minutes more, then clear a space in the middle of the vegetables and squeeze in the concentrate; add the tomatoes and give everything a good stir—simmer, uncovered, over medium heat for 1½ hours, stirring occasionally. If the sauce is very liquid, leave it uncovered. If it is not very liquid, leave it covered but with the lid ajar.Toward the end of cooking, stir in the salt and jaggery.
- Once the sauce is ready, roughly puree using an immersion blender. Serve with your choice of pasta, a sprinkling of pine nut parmesan, grilled zucchini, steamed broccoli or green beans.

Goodness shared from Stacey, Jonathan & Elijah


quietness


I just now went out into the garden.
It was so quiet and still out there, except for a single bird, melodious and sweet.

tara o’brady’s fig and ginger cluster granola
preparation 1 hour
makes approximately 8 cups
The recipe is taken from Taro O’brady’s Seven Spoons Cookbook, with minor changes.
Tara says, ‘This recipe is my standard and is intended only as a starting point. By all means, add, substitute, or subtract ingredients (add ground nutmeg or ginger or cardamom, or take away the seeds and go heavy on the nuts; swap pistachios for pecans, or dried apricots and dried cherries for the figs) as long as the general guidelines are loosely followed.’
wet ingredients
¼ cup/60g ghee/coconut oil
3 Tbsp/30g olive oil
3 Tbsp/55g maple syrup
½ cup/100g packed brown sugar or 100g rice syrup
½ cup/105g hot water
1 tsp fine rock salt – divided
1 tsp vanilla extract
dry ingredients
5 cups/455g old-fashioned rolled or quick-cooking oats
1½ – 2 cups/180g slivered almonds (chop whole almonds into thin slivers)
¾ cup/65g flaked coconut
¼ cup/35g sunflower seeds
¼ cup/35g sesame seeds
2 heaped tsp cinnamon powder
½ cup/70g candied ginger, finely chopped
1 cup/150g dried figs and sultanas, chopped
prepare the wet ingredients
- Preheat oven to 325F/160C.
- In a saucepan set over medium heat, melt the ghee into the olive oil and maple syrup. Turn off the heat and add the brown sugar, hot water, and ½ tsp salt. Cook, stirring often, until the sugar dissolves.
- Remove the saucepan from the heat, stir in the vanilla extract, and set aside to cool.
prepare the dry ingredients
- In a food processor fitted with a metal blade, grind 2 cups/180g of the oats into flour. Transfer to a large bowl.
- Stir in the remaining 3 cups/275g whole oats, the remaining ½ tsp salt, nuts, coconut, seeds and cinnamon powder.


- Pour the wet mixture over everything and stir to coat. Let stand for 10 minutes to allow the oats to soak up the sugar syrup.
- Cover one large tray with baking paper. Using your hands, drop the oat mixture in clumps onto the pans, then bake in the preheated oven until dry, lightly golden, and evenly toasted 45 – 50 minutes, gently stirring and turning the granola with a large spatula every 10-15 minutes.
- Remove the granola from the oven and leave it in the pan. It will continue to crisp as it stands. After 5 minutes, stir in the candied ginger. Once the granola has cooled completely, stir in the figs.
- Transfer the granola to an airtight container and store at room temperature for up to 2 weeks.

Goodness shared from Stacey

Chutney can be consumed with roti, chapati, dosa, idli, and rice. It is recommended for all constitutions. It can be used once or twice a week, at any time during the day, and in all seasons.
For those suffering from Pitta imbalance(excess heat), a little ghee can be mixed into the food to eliminate any aggravation. One may spice the dish as per his natural inclination, adding or lessening the salty, sweet, sour (tamarind), and pungent (chilli) tastes.


tip
If you are having trouble finding the toasted chana dal, over medium heat, dry-fry ¼ cup split channa dal until fragrant and proceed as in the recipe.
variation
Replace the dried coconut with the grated coconut meat from one whole coconut.

Ginger Coconut Chutney
preparation 10 minutes
makes approximately 2 cups
The recipe was shared by our teacher, Ganapati Aarya, as part of the Jivana Yoga Programme.
I make this quick and tasty chutney whenever I make dosa or idli. The dry-roasted channa dal can be purchased from your local India store, and once you purchase it, everything comes together within minutes.
ingredients
1 cup/80g unsweetened dried shredded coconut
1 – 2 cups lukewarm water (start with 1 cup for correct consistency)
¼ cup dry roasted channa dal
1 tsp ginger, finely chopped
½ –1 red/green chilli (according to taste and strength of chilli)
handful of coriander leaves
handful of fresh mint leaves
¼ tsp tamarind paste
1 tsp sugar/jaggery
½ tsp fine rock salt
preparation
- Place the dried coconut, dal, ginger, chilli, jaggery, salt, and tamarind paste in an upright blender. Wash the coriander and mint leaves and add them to the ingredients.
- Add 1 cup water and grind until you have a thick paste; add more water until you have the desired consistency. The texture should be a bit coarse.
- Taste for seasoning, adding salt, sweet, tamarind or chilli, as needed.

Goodness shared from Stacey

chuchu
(commonly known as Seemebadanekaayi in South India, or chayote squash in Mexico) is a pear-shaped, light-green vegetable in the gourd family. It has a crunchy texture and a mild, sweet taste. Chuchu is a perennial vine that climbs over fences, shrubs, and trees. There is no need to peel the skin in the young, tender pears. However, larger and over-mature fruits need light peeling using a vegetable peeler. When in season, you can find it in most supermarkets here in Portugal.
I make this weekly for a simple, no-fuss dinner – served with brown basmati rice and an extra drizzling of ghee. I also use them when making a simple dal – grated carrot and finely chopped chuchu – a magical combination.
how to sprout
Each chuchu contains a single seed enclosed within the fruit and cannot be separated from the fruit. Place the whole fruit on a light-filled window sill to sprout, and within days, the chuchu will sprout from the broad end. You can also set the whole fruit directly in the soil, and within a week or two, it will sprout.


Plant 1 chuchu vine per household of 4 persons. Chuchu is a vigorous climber; set a sturdy trellis or support in place at planting. Do not allow maturing fruit to come in contact with the soil; it will spoil and germinate while still attached to the vine. Chuchu will be ready for harvest when the fruit is tender and about 4 to 6 – inches in diameter, usually 120 to 150 days after planting. Cut chuchu from the vine with a knife or hand-pruner and harvest before the flesh gets hard.

chuchu gojju
preparation 30 minutes
serves 3 – 4
Our teacher, Ganapati Aarya, shared the recipe as part of the Jivana Yoga Programme.
Chuchu gojju is best served with rice or dosa – the dosa flavour and rice texture mix well with the flavour of this dish. It can also be served with chapati. However, decreasing the amount of tamarind (sour) added is best. Eggplant or capsicum can replace the chuchu; additional capsicum may also be added.
ingredients
1 medium/280g chuchu, chopped into small uniformed pieces
1 cup/250mL water
1½ tsp fine rock salt
3 heaped tsp brown sugar or jaggery
¼ cup coriander leaves, roughly chopped
voggarane
¼ cup/60ml peanut or coconut oil
½ tsp black mustard seeds
⅛ tsp asafoetida powder
⅛ tsp turmeric powder
15 fresh curry leaves
sambar – coconut paste
¾ cup/60g dried shredded coconut
2 heaped tsp Sambar powder- moderately spiced
1 tsp tamarind paste
2 cups/500mL water – divided
to serve
brown rice
voggarane
- Heat the oil in a pan over medium-high heat. Add mustard seeds; when they turn grey and pop, add asafoetida, turmeric powder, and curry leaves—continue to fry for a few seconds.
- Add the chuchu and 1 cup of water, simmer, and uncovered until the chuchu softens – about 15 minutes. Add salt and jaggery and mix well.
sambar – coconut paste
- Place the dried coconut, sambar powder, tamarind paste, and 1½ cups water in a blender and blend until smooth, approximately 1 minute.
- Add the sambar-coconut paste into gojju, using the remaining ½ cup water to swish the blender clean.
- Allow to simmer rapidly for 5 minutes, stirring once or twice, then turn off heat and add the coriander. Allow to sit for 5 minutes, then taste, and adjust the sweet, sour or salt to your preference. The gojju will thicken as it cools.

Goodness shared from Stacey


This garden breathes beautifully of our time here, and we are deeply grateful for the gifts it has given.


notes
I often make these muffins based on this Plum Millet Cake recipe. The sweet almond crumb adds a delicious crunchy texture that contrasts nicely with the raspberries’ sourness. These muffins are tender, fragrant, and light.
- When replacing the maple syrup, add ½ cup brown sugar plus ¼ cup/50g almond milk.
- I make my muffin liners by tearing up 12 x 12 cm square pieces of baking paper and pressing them into the tray using a glass base. If you grease the tin beforehand, the liners behave nicely.
- If you don’t have a muffin tin, this recipe can also be made as a cake; you will need to increase the baking time.

raspberry quinoa muffins with an almond crumb
makes 10 muffins (I use these sized baking cups)
ingredients
¼ cup/50g quinoa
½ cup/125ml water
almond crumb
½ cup/45g flaked almonds
2 Tbsp/25g brown sugar/coconut sugar
2 Tbsp/45g maple syrup
cake
1½ cup/210g whole-spelt flour
1 Tbsp aluminium-free baking powder
¾ cup/220g maple syrup
⅓ cup/65g mild-tasting olive or coconut oil
¼ cup/50g almond milk
1 Tbsp vanilla extract
zest of 1 lemon
¼ tsp fine rock salt
150g frozen/fresh raspberries
prepare the quinoa
- Rinse and drain the quinoa, place it in a pan, add water, and bring to a boil. Then, reduce the heat to maintain a rapid simmer—simmer for 15 – 20 minutes, uncovered, until the water has evaporated. Turn off the heat, cover, and let sit for 10 minutes, then measure out 1 cup/130g cooked quinoa—set aside.
- Preheat the oven to 180C/350F and fill a muffin tray with ten liners.
prepare the almond crumb
- In a small bowl, combine the flaked almonds, sugar, and maple syrup, stirring to combine. Set aside.
prepare the cake
- Whisk the flour and baking powder in a large bowl; set aside.
- In a medium jug, whisk together the maple syrup, oil, almond milk, vanilla, lemon zest, salt and cooked quinoa.
- Make a well in the centre of the flour mixture and pour in the wet ingredients. Using a rubber spatula, stir until well combined, then gently fold in the raspberries – be careful not to over-mix.
- Scoop the batter into muffin cups, filling them to the top using a spoon or an ice cream scoop. Spoon a teaspoon of the almond crumb on top of each muffin.
- Bake for 30 – 35 minutes, until golden or a toothpick comes out clean. Remove the muffins from the tin and place them on a wire rack to cool.
Serve with a generous dollop of Greek yoghurt.

Goodness shared from Stacey

This recipe was quite a journey. After many attempts and too many references to mention, I persevered, as there seemed too much scrumptious potential in these cookies to give up. It felt like I was conjuring up a kind of magic, from the transformation of ingredients to the finished result – even more so due to the many attempts to get here. I am now satisfied to share it with you.
notes
- The filling could replace any dried fruit of choice—dates would work nicely. I used 1 cup whole almonds, which I ground in a blender. Blanched almonds would give a much more visually pronounced contrast between the filling and the dough.
- I wanted to achieve a lighter cookie, so I used white spelt flour, but it can be replaced with whole spelt or rice flour for a gluten-free version.
- I call this a dough, but to clarify, it doesn’t handle like a regular dough—it is very fragile and easily crumbles. This is why working between two pieces of baking paper is recommended. The results are delicious and worth all the fiddliness.


benefits
- In Ayurveda, sultanas are considered the kingly of all fruits, figs are considered precious, and winter citrus adds colour and zest to the last of these dark and rainy days.
- Figs, whether fresh or dried, are an incredibly healthy treat. They have favourable calcium levels and contain iron, potassium, manganese, and vitamin B6. They also have a high fibre content, keeping us fuller for longer and having a helpful laxative effect.
- When buying any dried fruit, look for organic and sulphite-free.

fig almond orange swirl cookies
makes approximately 18 cookies.
Recipe inspired from here.
Not overly sweet, the luscious fig filling is deeply flavourful, and the pastry is light and buttery.
ingredients for the dough
1½ cups/130g almond meal (1 cup whole almonds ground in a blender)
1 cup/120g white spelt flour
⅛ tsp fine rock salt
¼ cup/60ml olive oil
2 heaped Tbsp brown sugar/coconut sugar
¼ cup/60ml freshly squeezed orange juice
½ tsp baking soda
½ tsp baking powder
fig paste
9 medium/180g dried soft figs
½ packed cup/80g dried sultanas/raisins
orange zest of 1 orange
½ tsp cinnamon powder
¼ cup/60ml fresh orange juice
sesame seeds for garnishing
prepare the dough
- Set the oven to 180C/360F. Line a baking sheet with baking paper.
- Combine the almond meal, flour, and salt in a medium bowl, whisking well. Set aside.
- Whisk the oil and sugar in a small bowl for 1 minute, then add the fresh orange juice, baking powder, and baking soda until combined. It will billow up and turn into the most gorgeous, soft, golden colour.
- Slowly add to the flour and almond meal mixture, then gently combine. The dough should be quite moist and soft. Cover and refrigerate while making the fig paste.
prepare the fig paste
- Remove and discard the hard stems from the figs. Chop in half, then place in a food processor, along with the sultanas and orange zest. Process until the figs are nicely broken up. Add cinnamon powder and pour in the orange juice. Process until it forms a thick, sticky paste and starts to come together. Cover and set aside.
to assemble
- Remove the dough from the fridge and place it on baking paper. Place another piece of baking paper on top and roll the dough into a rectangle under ¼-inch thick, approximately 15 x 9 inches. (It is fine for the dough to be longer than 15 inches, but make sure it is no wider than 9 – 10 inches.) To make a neat rectangle, trim any excess dough around the sides and press it into the corners that need more shaping.
- Spoon the fig filling over the dough and spread evenly, ensuring it covers the edges. Use the baking paper to gently roll the dough’s long side around the filling to form a neat log. Leave the seam side down as the weight of the roll seals the edge.
- Sprinkle the top with sesame seeds, and use the outer edges of the baking paper to help press the seeds into the top and sides, pressing any seeds that have fallen. The dough and fig paste contrast will be more pronounced after baking. Place the log in the freezer for 20 minutes to firm it up for easier cutting.
- With a sharp knife, slice into 2 cm thick pieces, wiping the knife after each cut. If you want more of a perfectly round shape, rotate the roll after several cuts, then give it a gentle squeeze to reshape it into rounds on the tray. Carefully transfer them to the baking tray, laying them flat with the spiral of the fig paste facing up.
- Bake for 30 minutes, rotating the tray halfway through baking until golden in colour. Remove from the oven.
It is delicious eaten warm, later that same day, or the next.